
Los generadores de sitios estáticos (SSG) como Hugo son imbatibles en velocidad y seguridad. Al compilar todo en archivos HTML puros, eliminamos vectores de ataque y dependencias de bases de datos. Sin embargo, surge un problema clásico: ¿Cómo agregamos interactividad básica, como un contador de “Likes”, sin arruinar la naturaleza estática del sitio?
Inicialmente, la respuesta fácil es integrar un servicio de terceros (SaaS). Es rápido y funciona. Pero como ingenieros de infraestructura, depender de una API externa nos enfrenta a dos problemas fundamentales: la pérdida de soberanía sobre nuestros datos y los inevitables muros de pago (paywalls) cuando el tráfico aumenta. La solución definitiva no es buscar un clon Open Source pesado, sino construir nuestro propio microservicio minimalista.
La Arquitectura Minimalista y Seguridad Zero-Trust
El objetivo era construir un backend de consumo casi nulo (menos de 30MB de RAM) utilizando Python (FastAPI) y SQLite. Para proteger la infraestructura, implementamos un modelo de seguridad en dos capas apoyado en Cloudflare Tunnels:
- Aislamiento de Red: El contenedor de la API no expone ningún puerto al host. Vive en una red interna de Docker (
cloudflare_internal_net) donde el demoniocloudflaredlo enruta hacia el exterior (api.midominio.com). - Control de Acceso (CORS y API Key): Las rutas públicas (para registrar likes) están protegidas por estrictas políticas de CORS. Las rutas administrativas (el dashboard) exigen una llave secreta (
X-API-Key) inyectada en las cabeceras HTTP. - Anti-Spam Local: En lugar de saturar la base de datos registrando IPs, utilizamos
localStorageen el navegador del usuario para bloquear interacciones duplicadas, dejando que el WAF de Cloudflare detenga ataques volumétricos reales.
1. Crea la estructura
Crea una carpeta dedicada para este microservicio.

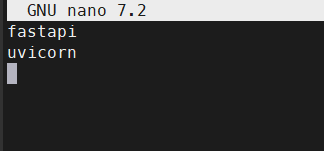
Crea los requerimientos
requirements.txt

Agrega
- fastapi
- uivorn
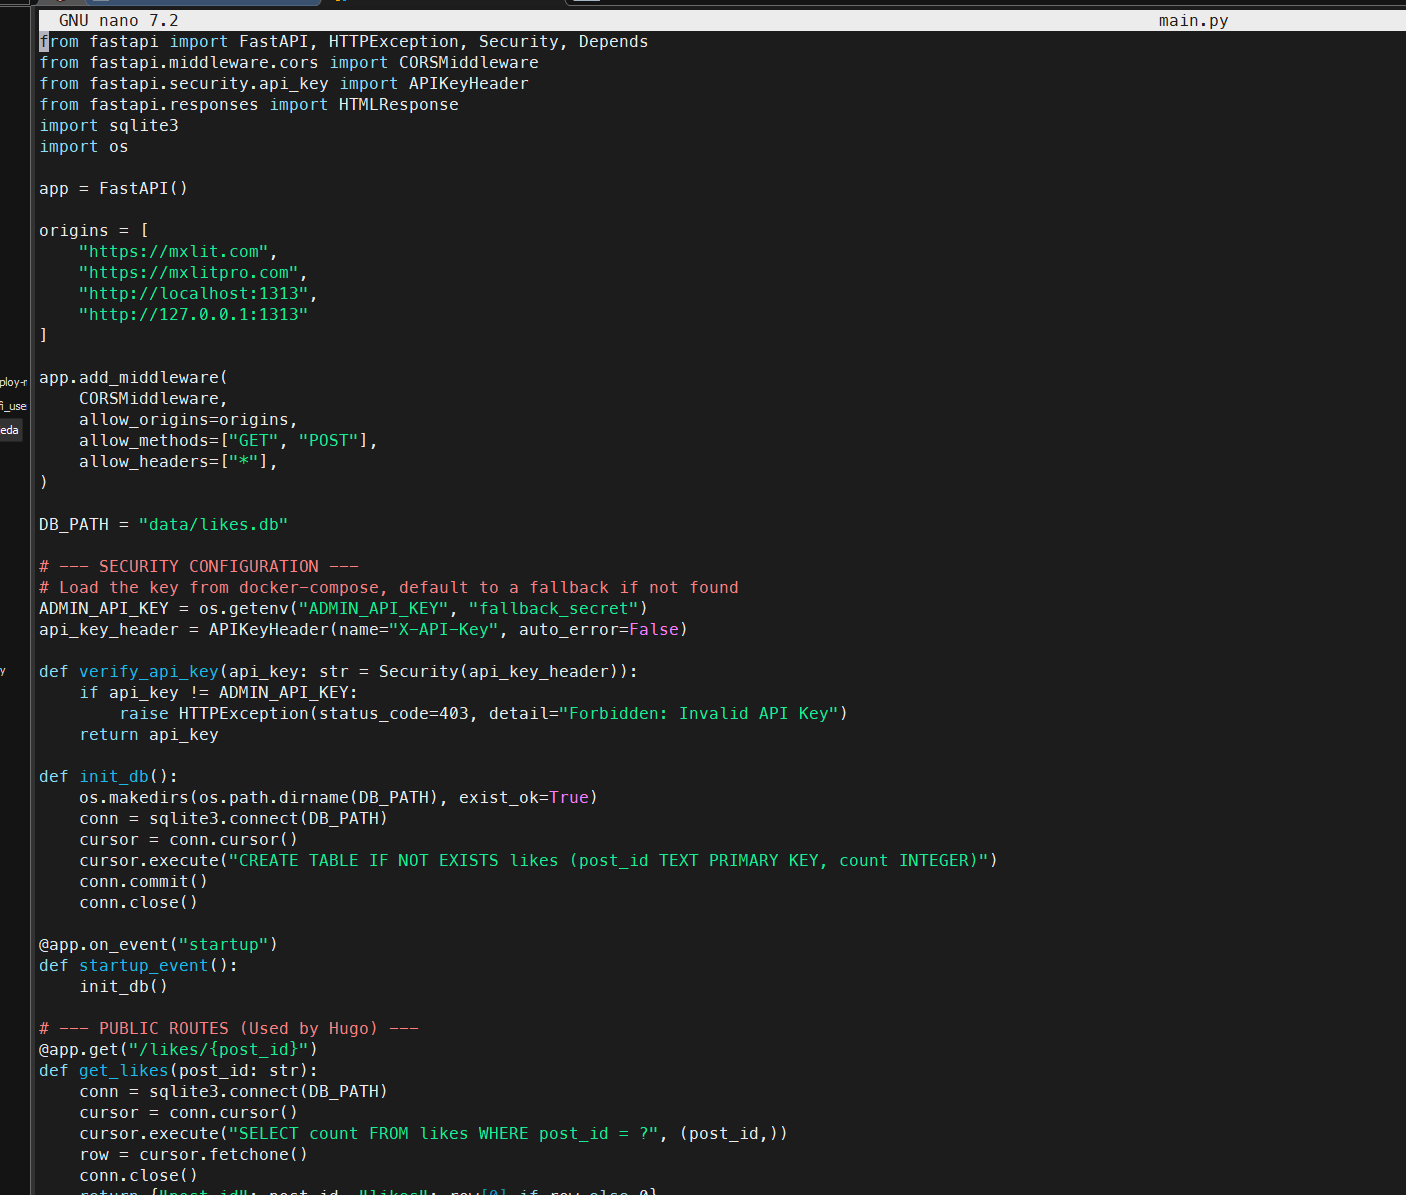
1. El Backend (main.py)
Este script de FastAPI levanta la base de datos, expone los endpoints públicos para el blog y protege las rutas de administración.
from fastapi import FastAPI, HTTPException, Security, Depends
from fastapi.middleware.cors import CORSMiddleware
from fastapi.security.api_key import APIKeyHeader
from fastapi.responses import HTMLResponse
import sqlite3
import os

app = FastAPI()

# Allow CORS only from approved domains
origins = [
    "[https://mxlit.com](https://mxlit.com)",
    "http://localhost:1313",
    "[http://127.0.0.1:1313](http://127.0.0.1:1313)" #<-- Add your local IP for testing!
]

app.add_middleware(
    CORSMiddleware,
    allow_origins=origins,
    allow_methods=["GET", "POST"],
    allow_headers=["*"],
)

DB_PATH = "data/likes.db"

# --- SECURITY CONFIGURATION ---
# Load the secret key from environment variables
ADMIN_API_KEY = os.getenv("ADMIN_API_KEY", "fallback_secret")
api_key_header = APIKeyHeader(name="X-API-Key", auto_error=False)

def verify_api_key(api_key: str = Security(api_key_header)):
    if api_key != ADMIN_API_KEY:
        raise HTTPException(status_code=403, detail="Forbidden: Invalid API Key")
    return api_key

def init_db():
    # Ensure directory exists and create table on first run
    os.makedirs(os.path.dirname(DB_PATH), exist_ok=True)
    conn = sqlite3.connect(DB_PATH)
    cursor = conn.cursor()
    cursor.execute("CREATE TABLE IF NOT EXISTS likes (post_id TEXT PRIMARY KEY, count INTEGER)")
    conn.commit()
    conn.close()

@app.on_event("startup")
def startup_event():
    init_db()

# --- PUBLIC ROUTES (Used by Hugo) ---
@app.get("/likes/{post_id}")
def get_likes(post_id: str):
    conn = sqlite3.connect(DB_PATH)
    cursor = conn.cursor()
    cursor.execute("SELECT count FROM likes WHERE post_id = ?", (post_id,))
    row = cursor.fetchone()
    conn.close()
    return {"post_id": post_id, "likes": row[0] if row else 0}

@app.post("/likes/{post_id}")
def add_like(post_id: str):
    conn = sqlite3.connect(DB_PATH)
    cursor = conn.cursor()
    cursor.execute("SELECT count FROM likes WHERE post_id = ?", (post_id,))
    row = cursor.fetchone()

    if row:
        new_count = row[0] + 1
        cursor.execute("UPDATE likes SET count = ? WHERE post_id = ?", (new_count, post_id))
    else:
        new_count = 1
        cursor.execute("INSERT INTO likes (post_id, count) VALUES (?, ?)", (post_id, new_count))

    conn.commit()
    conn.close()
    return {"post_id": post_id, "likes": new_count}

# --- PRIVATE ADMIN ROUTES (Secured with API Key) ---
@app.get("/api/stats")
def get_all_stats(api_key: str = Depends(verify_api_key)):
    conn = sqlite3.connect(DB_PATH)
    cursor = conn.cursor()
    # Fetch all posts, ordered by most liked
    cursor.execute("SELECT post_id, count FROM likes ORDER BY count DESC")
    rows = cursor.fetchall()
    conn.close()
    return [{"post_id": row[0], "likes": row[1]} for row in rows]

@app.get("/dashboard", response_class=HTMLResponse)
def serve_dashboard():
    # Serve the static HTML dashboard file
    try:
        with open("dashboard.html", "r", encoding="utf-8") as f:
            return f.read()
    except FileNotFoundError:
        raise HTTPException(status_code=404, detail="Dashboard UI file not found")
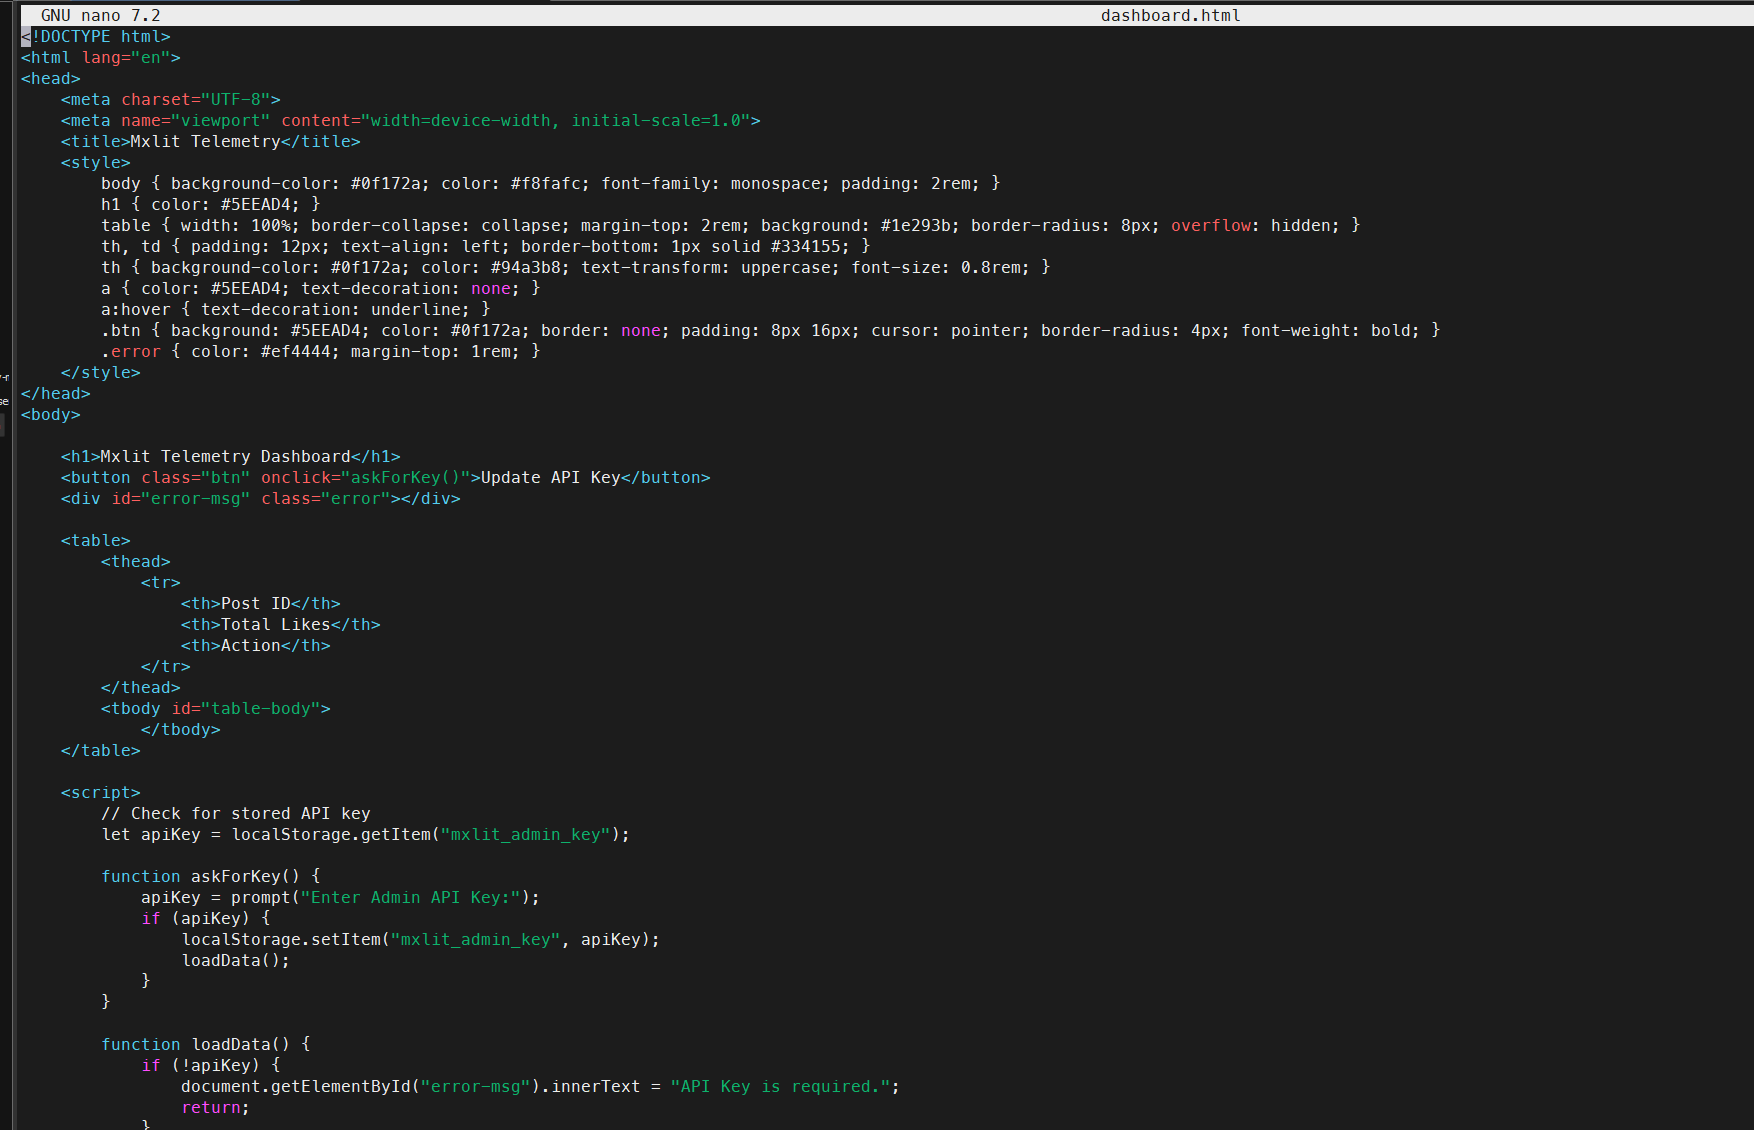
2. El Dashboard Seguro (dashboard.html)
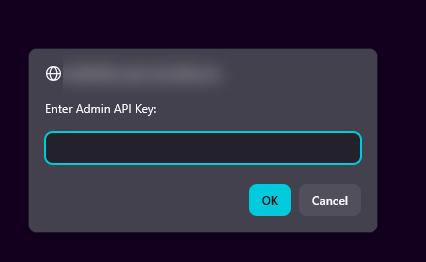
Para evitar enviar la llave secreta en texto plano a través de URLs o parámetros, el dashboard solicita la contraseña mediante un prompt local y la envía de forma segura en los Headers de la petición HTTP.
<!DOCTYPE html>
<html lang="en">
<head>
    <meta charset="UTF-8">
    <meta name="viewport" content="width=device-width, initial-scale=1.0">
    <title>Mxlit Telemetry</title>
    <style>
        body { background-color: #0f172a; color: #f8fafc; font-family: monospace; padding: 2rem; }
        h1 { color: #5EEAD4; }
        table { width: 100%; border-collapse: collapse; margin-top: 2rem; background: #1e293b; border-radius: 8px; overflow: hidden; }
        th, td { padding: 12px; text-align: left; border-bottom: 1px solid #334155; }
        th { background-color: #0f172a; color: #94a3b8; text-transform: uppercase; font-size: 0.8rem; }
        a { color: #5EEAD4; text-decoration: none; }
        a:hover { text-decoration: underline; }
        .btn { background: #5EEAD4; color: #0f172a; border: none; padding: 8px 16px; cursor: pointer; border-radius: 4px; font-weight: bold; }
        .error { color: #ef4444; margin-top: 1rem; }
    </style>
</head>
<body>

    <h1>Mxlit Telemetry Dashboard</h1>
    <button class="btn" onclick="askForKey()">Update API Key</button>
    <div id="error-msg" class="error"></div>

    <table>
        <thead>
            <tr>
                <th>Post ID</th>
                <th>Total Likes</th>
                <th>Action</th>
            </tr>
        </thead>
        <tbody id="table-body">
            </tbody>
    </table>

    <script>
        // Check for stored API key in browser storage
        let apiKey = localStorage.getItem("mxlit_admin_key");

        function askForKey() {
            apiKey = prompt("Enter Admin API Key:");
            if (apiKey) {
                localStorage.setItem("mxlit_admin_key", apiKey);
                loadData();
            }
        }

        function loadData() {
            if (!apiKey) {
                document.getElementById("error-msg").innerText = "API Key is required.";
                return;
            }

            // Fetch protected stats endpoint using Headers
            fetch("/api/stats", {
                headers: { "X-API-Key": apiKey }
            })
            .then(response => {
                if (!response.ok) throw new Error("Invalid API Key or Server Error");
                return response.json();
            })
            .then(data => {
                document.getElementById("error-msg").innerText = "";
                const tbody = document.getElementById("table-body");
                tbody.innerHTML = "";

                data.forEach(row => {
                    const tr = document.createElement("tr");
                    const postLink = `https://mxlit.com/${row.post_id}`;

                    tr.innerHTML = `
                        <td>${row.post_id}</td>
                        <td style="color: #5EEAD4; font-weight: bold;">${row.likes}</td>
                        <td><a href="${postLink}" target="_blank">View Post ↗</a></td>
                    `;
                    tbody.appendChild(tr);
                });
            })
            .catch(err => {
                document.getElementById("error-msg").innerText = err.message;
            });
        }

        // Load data on start if key exists
        if (!apiKey) askForKey();
        else loadData();

    </script>
</body>
</html>
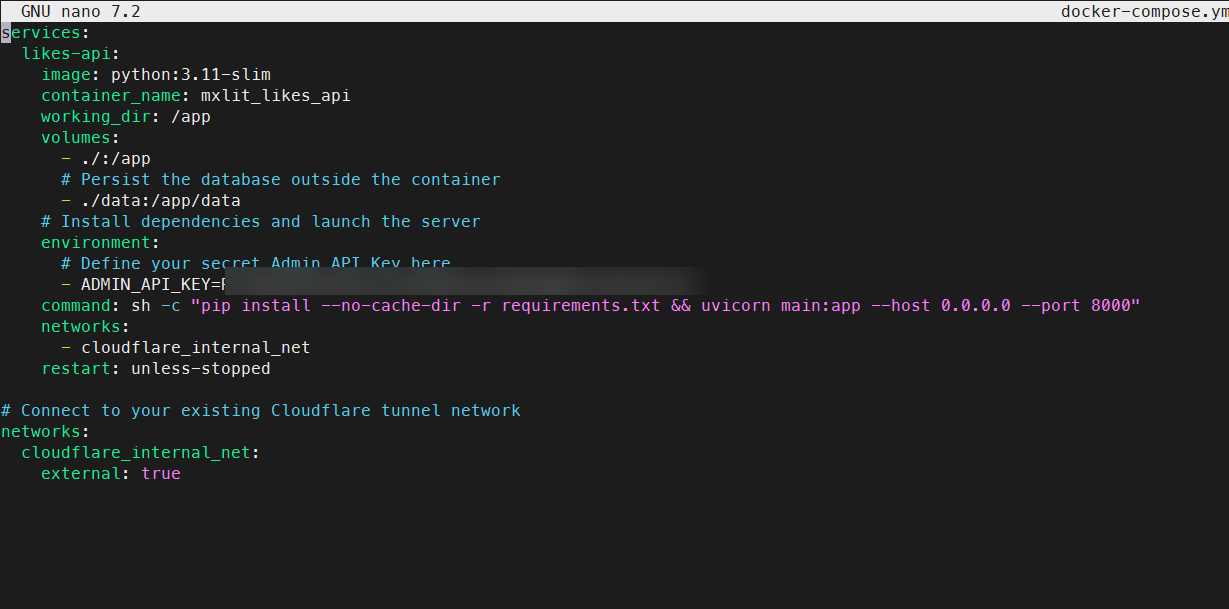
3. Despliegue (docker-compose.yml)
El contenedor no expone puertos y define la llave secreta como variable de entorno, inyectándose de manera segura en la red de Cloudflare.
services:
  likes-api:
    image: python:3.11-slim
    container_name: mxlit_likes_api
    working_dir: /app
    volumes:
      - ./:/app
      # Persist the SQLite database outside the container
      - ./data:/app/data
    environment:
      # Define your secret Admin API Key here
      - ADMIN_API_KEY=TuSuperPasswordSecreto123
    # Install dependencies and launch the server
    command: sh -c "pip install --no-cache-dir -r requirements.txt && uvicorn main:app --host 0.0.0.0 --port 8000"
    networks:
      - cloudflare_internal_net
    restart: unless-stopped

# Connect to your existing Cloudflare tunnel network
networks:
  cloudflare_internal_net:
    external: true
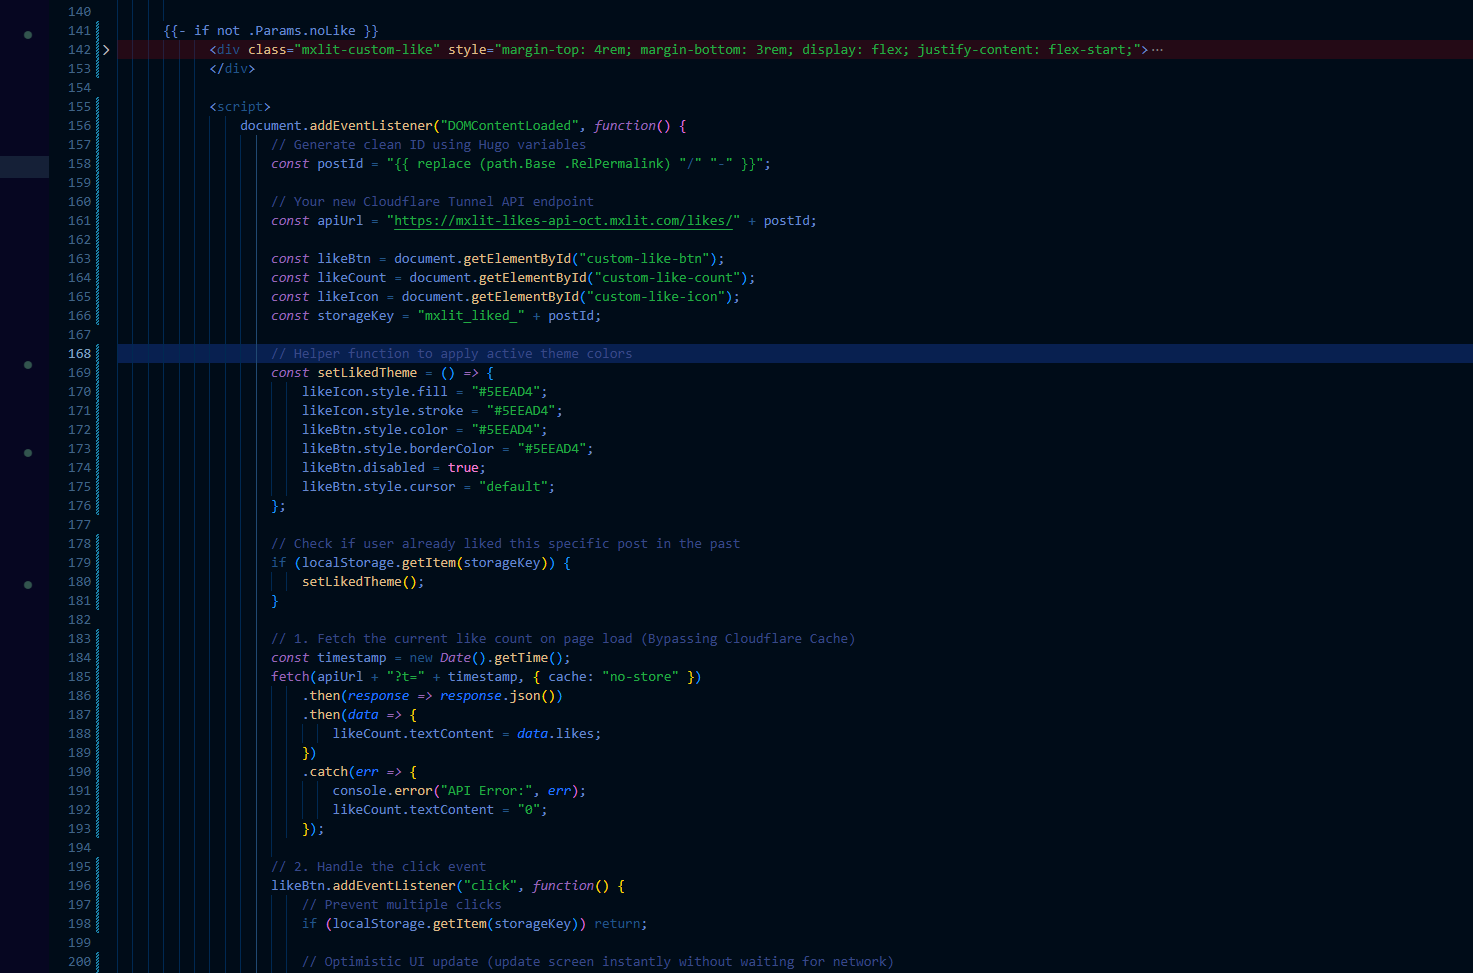
4. Integración en el Frontend de Hugo (Vanilla JS)
Del lado de Hugo, implementamos un widget ligero utilizando Javascript nativo. Este script realiza dos tareas vitales:
Optimistic UI: Actualiza el contador en pantalla instantáneamente al hacer clic.
Cache-Busting & Anti-Spam: Agrega un timestamp al
fetchpara saltarse la caché agresiva de Cloudflare, y guarda el estado en ellocalStoragedel navegador para deshabilitar el botón y evitar votos duplicados accidentales. Agrega este bloque en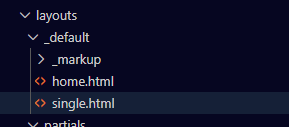
{{- if not .Params.noLike }}
<div class="mxlit-custom-like" style="margin-top: 4rem; margin-bottom: 3rem; display: flex; justify-content: flex-start;">

    <button id="custom-like-btn" style="background: none; border: 1px solid rgba(94, 234, 212, 0.2); border-radius: 6px; padding: 8px 16px; cursor: pointer; display: flex; align-items: center; gap: 8px; color: #FFFFFF; font-family: monospace; transition: all 0.2s ease;">

        <svg id="custom-like-icon" width="20" height="20" viewBox="0 0 24 24" fill="none" stroke="currentColor" stroke-width="2" stroke-linecap="round" stroke-linejoin="round">
            <path d="M20.84 4.61a5.5 5.5 0 0 0-7.78 0L12 5.67l-1.06-1.06a5.5 5.5 0 0 0-7.78 7.78l1.06 1.06L12 21.23l7.78-7.78 1.06-1.06a5.5 5.5 0 0 0 0-7.78z"></path>
        </svg>

        <span id="custom-like-count">...</span>
    </button>

</div>

<script>
    document.addEventListener("DOMContentLoaded", function() {
        // Generate clean ID using Hugo variables
        const postId = "{{ replace (path.Base .RelPermalink) "/" "-" }}";

        // Target your internal Cloudflare Tunnel API endpoint
        const apiUrl = "[https://api.midominio.com/likes/](https://api.midominio.com/likes/)" + postId;

        const likeBtn = document.getElementById("custom-like-btn");
        const likeCount = document.getElementById("custom-like-count");
        const likeIcon = document.getElementById("custom-like-icon");
        const storageKey = "mxlit_liked_" + postId;

        // Helper function to apply active theme colors
        const setLikedTheme = () => {
            likeIcon.style.fill = "#5EEAD4";
            likeIcon.style.stroke = "#5EEAD4";
            likeBtn.style.color = "#5EEAD4";
            likeBtn.style.borderColor = "#5EEAD4";
            likeBtn.disabled = true;
            likeBtn.style.cursor = "default";
        };

        // Check if user already liked this specific post
        if (localStorage.getItem(storageKey)) {
            setLikedTheme();
        }

        // 1. Fetch the current like count on page load (Bypassing Cloudflare Cache)
        const timestamp = new Date().getTime();
        fetch(apiUrl + "?t=" + timestamp, { cache: "no-store" })
            .then(response => {
                if (!response.ok) throw new Error("HTTP Status " + response.status);
                return response.json();
            })
            .then(data => {
                // Apply real number from database
                likeCount.textContent = data.likes;
            })
            .catch(err => {
                // Fail silently (Graceful degradation for Ad-Blockers)
                console.warn("API unreachable, degrading to 0");
                likeCount.textContent = "0";
            });

        // 2. Handle the click event
        likeBtn.addEventListener("click", function() {
            // Prevent multiple clicks
            if (localStorage.getItem(storageKey)) return;

            // Optimistic UI update
            let currentLikes = parseInt(likeCount.textContent) || 0;
            likeCount.textContent = currentLikes + 1;
            setLikedTheme();

            // Save state to browser storage
            localStorage.setItem(storageKey, "true");

            // Send POST request to increment DB
            fetch(apiUrl, { method: "POST" })
                .catch(err => console.error("API Post Error:", err));
        });
    });
</script>
{{- end }}
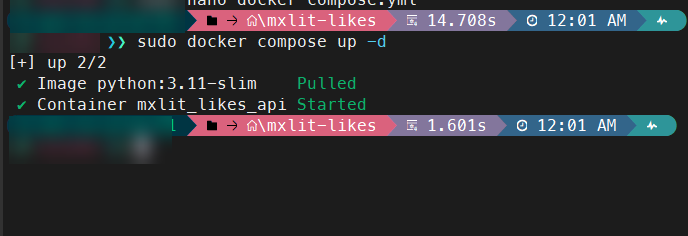
Levanta el contenedor
Es momento de la verdad Levanta el contenedor con
sudo docker compose up -d
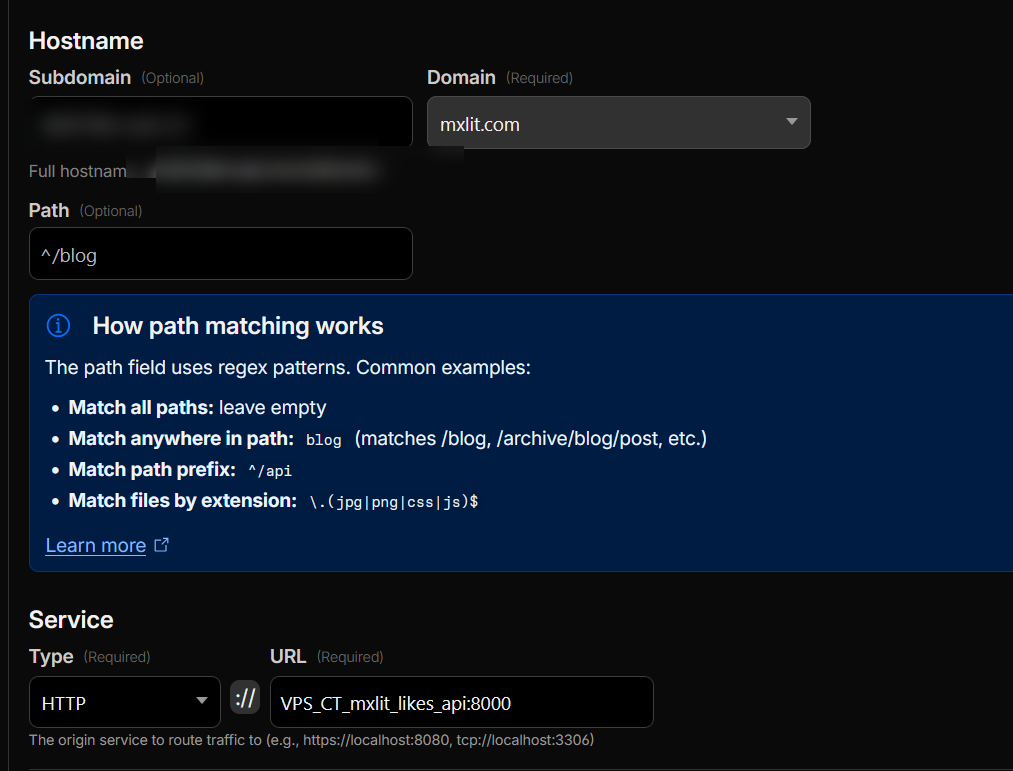
Configuración en Cloudflare
Ingresa en Cloudflare tunnels, crea un nuevo hostname y usa HTTP A tu contenedor con el puerto 8000. Recuerda que estamos usando la red de Cloudflare en Docker.
Comprobación
Ingresa a tu Dashboard.
Ahora los posts contienen un botón de like

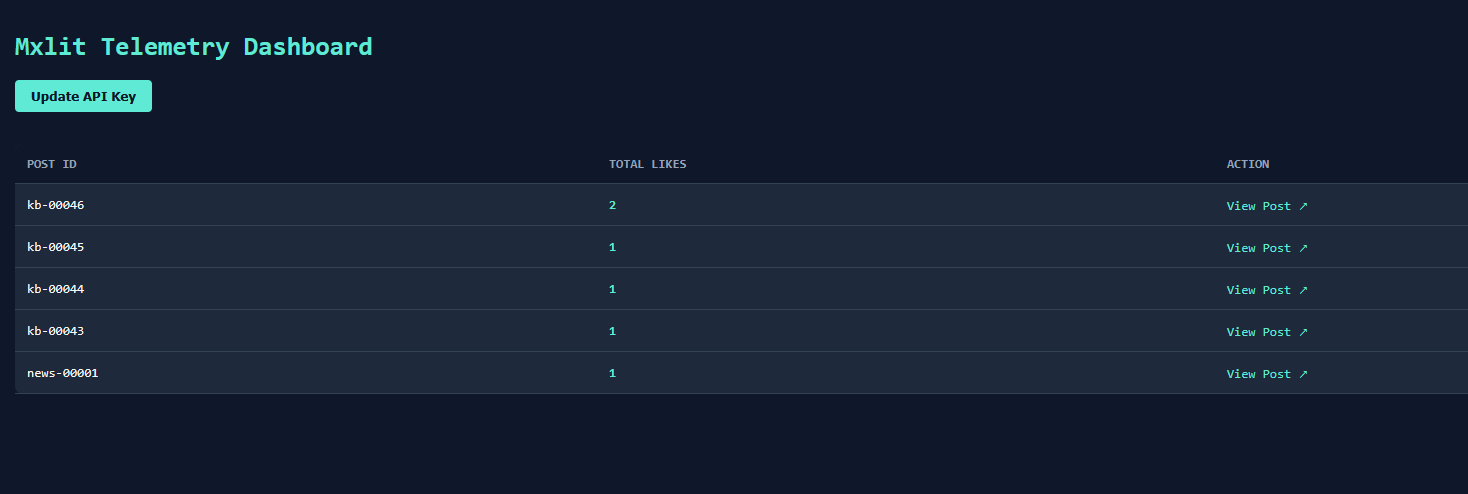
Dashboard
Si ingresas a https://api.tudominio.com/dashboard Deberías poder ver tu dashboard al ingresar el API Key definido previamente.
Pasos finales: Rate Limiting en Cloudflare
Debido a que CORS no protege de SPAM, agregaremos un rage limit, para ello delegamos el trabajo pesado a la capa perimetral: Cloudflare.
Ya que tu tráfico pasa por un túnel de Cloudflare, podemos crear una regla gratuita en su WAF (Web Application Firewall) para detener este spam en seco, antes de que siquiera toque tu servidor.
Cómo configurarlo:
Entra a tu panel de Cloudflare y ve a tu dominio
mxlit.com.En el menú lateral, ve a Security -> WAF -> pestaña Rate Limiting rules.
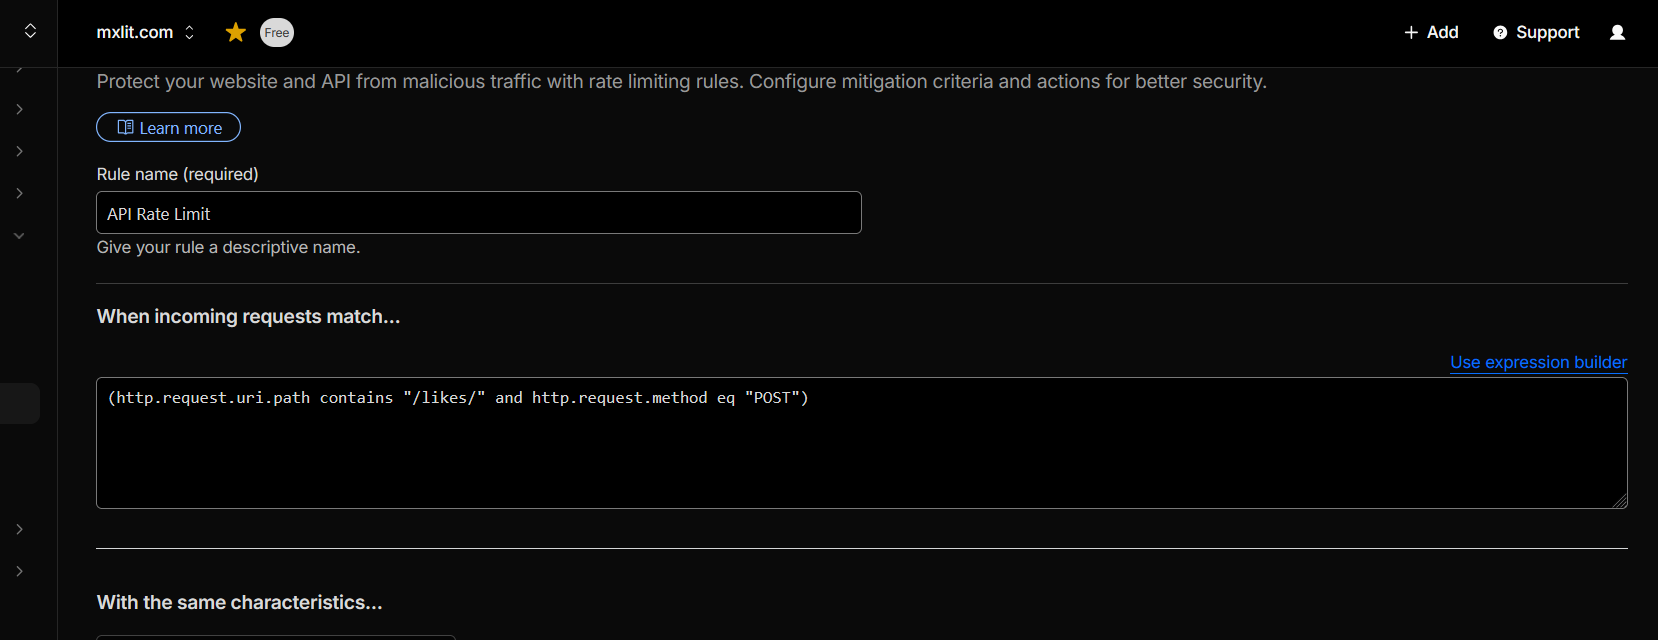
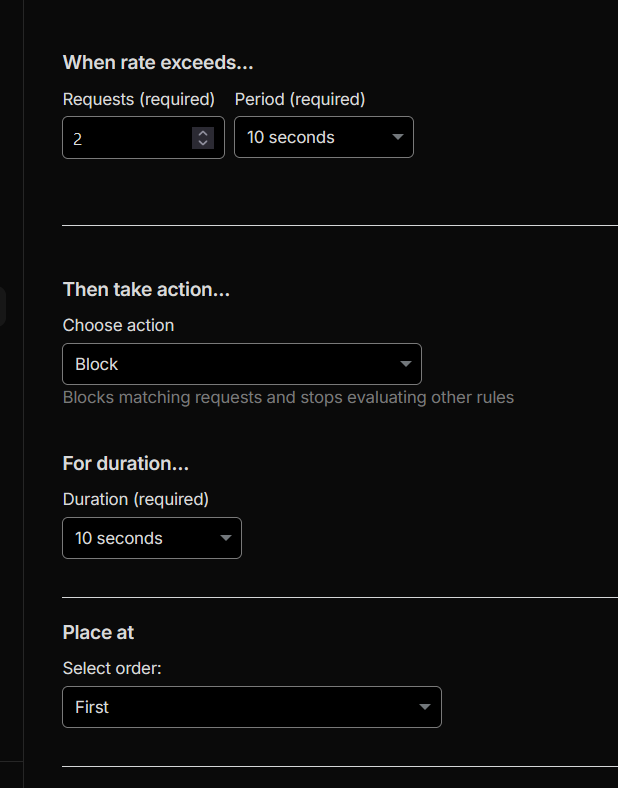
Crea una nueva regla con esta lógica:
If incoming requests match:
Field:
URI Path-> Operator:contains-> Value:/likes/AND * Field:
Request Method-> Operator:equals-> Value:POST
With the same characteristics:
IPWhen rate exceeds:
2requestsPeriod:
10 secondsThen take action:
Block(por 10 segundos, por ejemplo).
Si no ves esas opciones puedes optar por usar una expresión
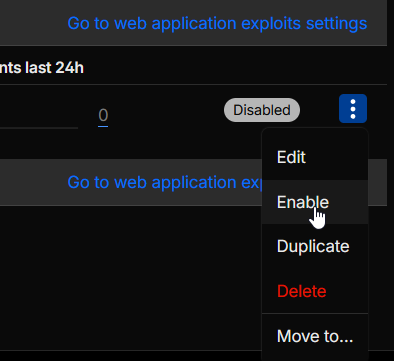
Una vez creada la regla, solo actívala

El Resultado
Con esta regla activa, un usuario legítimo leyendo tu blog nunca notará nada. Pero si un “chistoso” descubre tu URL e intenta mandar un bucle de 100 curl por segundo desde su terminal, Cloudflare dejará pasar los primeros 5 y luego le cerrará la puerta en la cara devolviéndole un error 429 Too Many Requests u bloqueándolo por completo, manteniendo tu base de datos de SQLite limpia y tu servidor sin carga de CPU.
Conclusión
Abandonar un SaaS no siempre significa instalar aplicaciones Open Source gigantescas de cientos de megabytes. A veces, la mejor solución es aplicar ingeniería inversa a la necesidad real y programar una herramienta a la medida. Con esta arquitectura, logramos mantener un sitio 100% estático, incorporando telemetría dinámica sin sacrificar rendimiento, privacidad, ni el control de nuestra infraestructura.