
If you have followed our previous guides, you now have a 3-node virtual Isilon cluster running with Enterprise licenses activated. However, at this point, it is still just a group of servers. To transform Isilon into a true Scale-Out NAS—where all nodes work as a single brain—we need to configure its “secret sauce”: SmartConnect.
In this article, we will break down the architecture behind SmartConnect, why it is so powerful, and how to configure it step-by-step using Windows Server DNS, the industry standard.
What is SmartConnect and why do you need it?
In a traditional NAS, you typically map a network drive pointing to a single IP address. The problem is that if hundreds of users connect to that IP, they saturate the network card and processor of that single controller, creating a significant bottleneck.
Isilon solves this brilliantly. SmartConnect is a DNS load balancer integrated directly into OneFS. When a user or server tries to connect to your storage (e.g., storage.mxlit.com), SmartConnect intercepts that DNS request and responds intelligently, delivering the IP of the node that is least busy (using Round Robin or other metrics). This ensures that your company’s thousands of connections are perfectly distributed across all nodes in the cluster.
The Architecture: SIP, Zone Name, and Delegation
For this magic to happen, we need four key components:
- IP Pool (Data IPs): A range of dedicated IPs for data traffic (e.g.,
10.0.5.100 - 10.0.5.110in your storage VLAN). - SIP (Service IP): The cluster’s “master” IP for SmartConnect. This IP never transfers data; its only job is to listen for DNS requests.
- SmartConnect Zone Name: The domain name users will use to map their folders (e.g.,
storage.mxlit.com). - DNS Delegation: The rule in your Windows Server that says: “If someone asks for
storage.mxlit.com, I don’t know the answer; ask the Isilon SIP instead.”
Step 1: Configure the Data Network and Pool in OneFS
First, we will give Isilon its data IPs and configure the SmartConnect zone. In modern OneFS versions, we must follow a specific hierarchy: Subnet first, then Pool.
1A: Creating the Subnet (The SIP’s Home)
Log in to your cluster’s WebUI (
https://<Node-IP>:8080).Navigate to Cluster Management > Network Configuration.
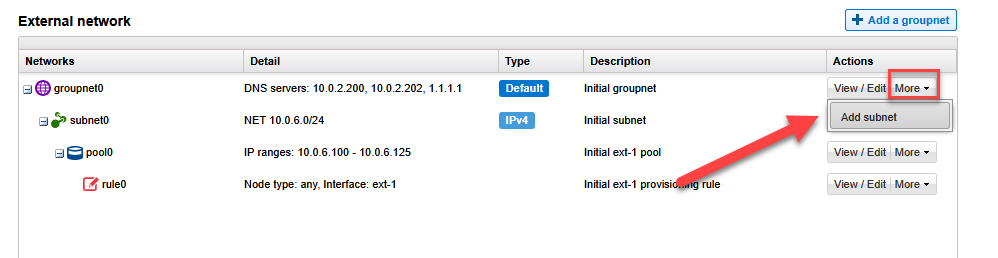
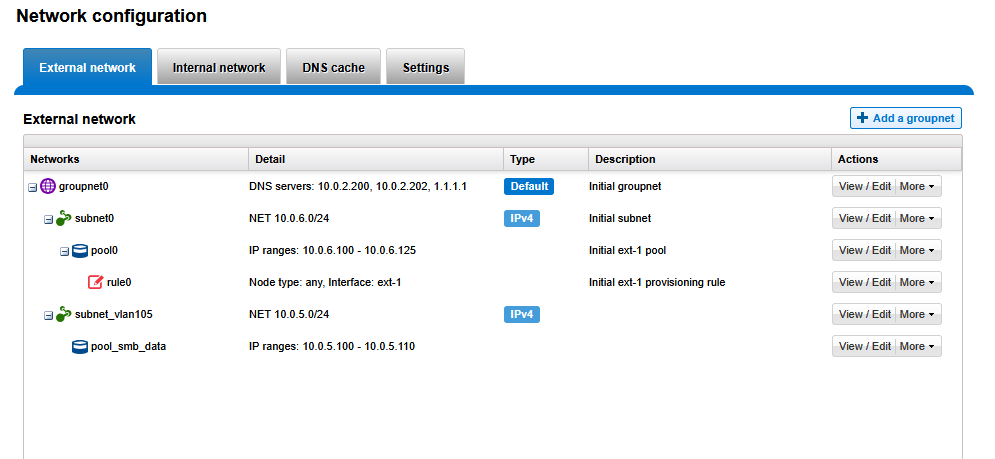
In the External Network tab, click Add subnet.
Name: Assign an identified name, such as
subnet_vlan105.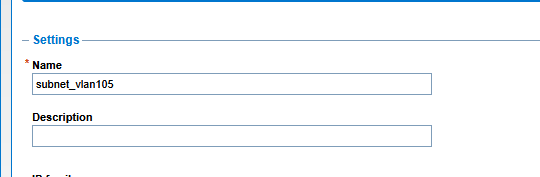
Netmask & Gateway: Enter your VLAN parameters (e.g.,
10.0.5.0/24with gateway10.0.5.254).SmartConnect Service IP: Enter your specific service IP (SIP), such as
10.0.5.250.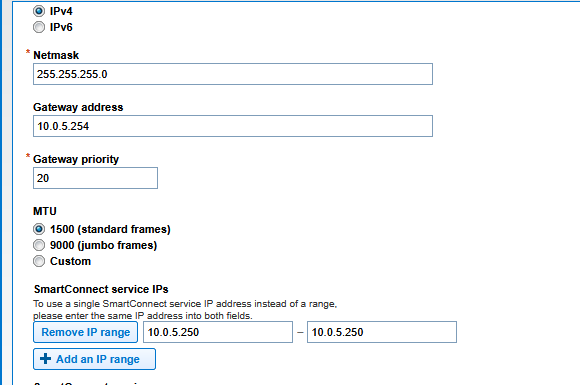
1B: Creating the IP Pool
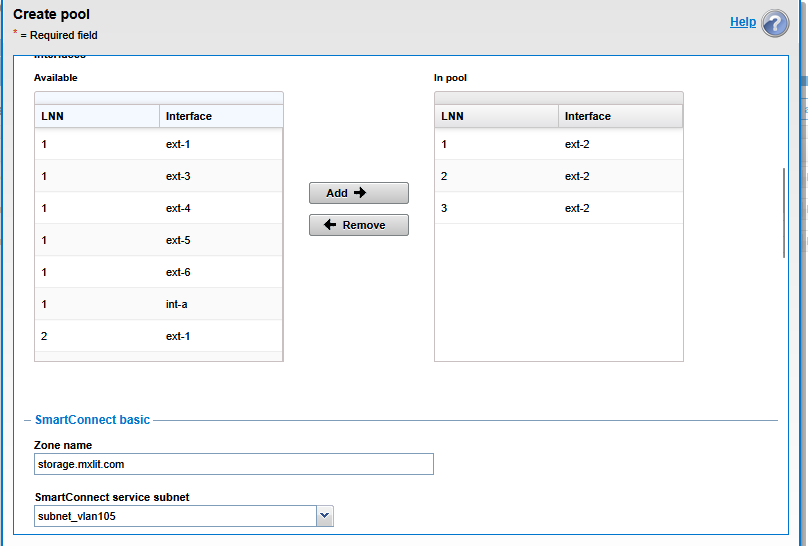
Beneath the new subnet, click Add pool:
Name: Such as
pool_smb_data.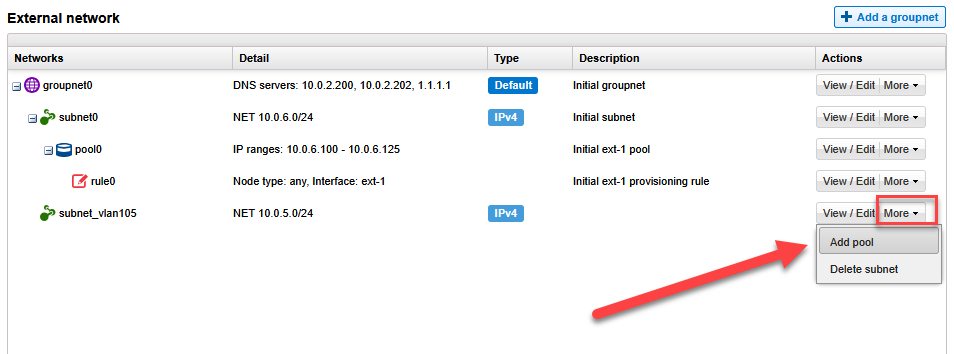
IP range: Define the dynamic IP range for your nodes (e.g.,
10.0.5.100 - 10.0.5.110).
Interfaces: Select the network interfaces that will handle this traffic (e.g.,
ext-2on all nodes).SmartConnect Zone name: Enter your storage FQDN (e.g.,
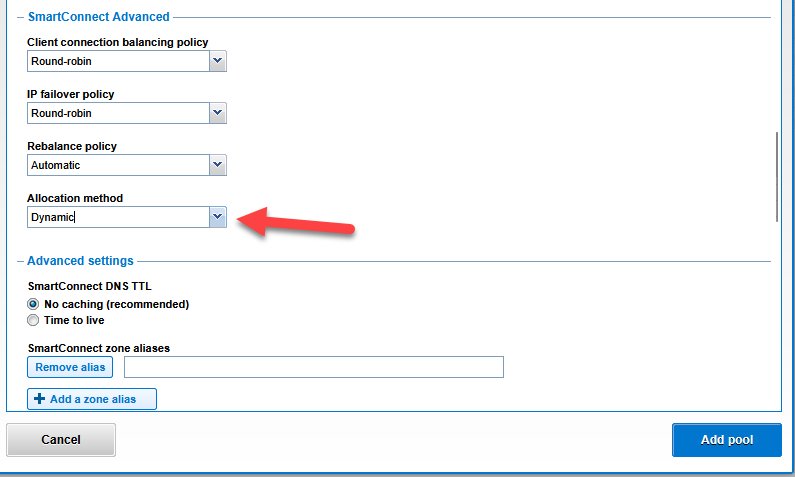
storage.mxlit.com).Allocation method (CRITICAL): Change this from Static to Dynamic. With the SmartConnect Advanced license, the dynamic method ensures High Availability (HA); if a node fails, its IP will transparently “hop” to another healthy node.
Step 2: Windows Server DNS Delegation
Now we bridge the Microsoft world with Dell EMC. We must tell the Domain Controller to delegate authority for the storage subdomain to Isilon.
Graphical Method (GUI)
Open DNS Manager on your Windows Server.
Create a New Host (A record) named
sip-storagepointing to your SIP (10.0.5.250).
Right-click your domain and select New Delegation…

In the wizard, enter the delegated name (e.g.,
storage).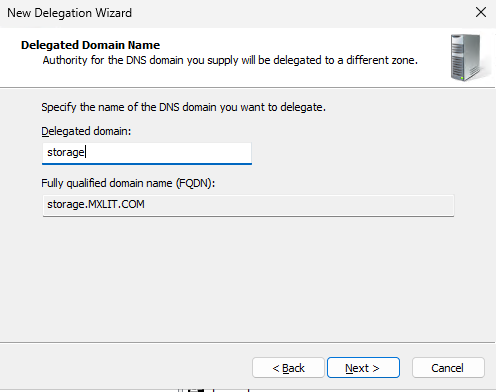
In the Name Servers screen, Add the FQDN of the A record you just created (
sip-storage.mxlit.com).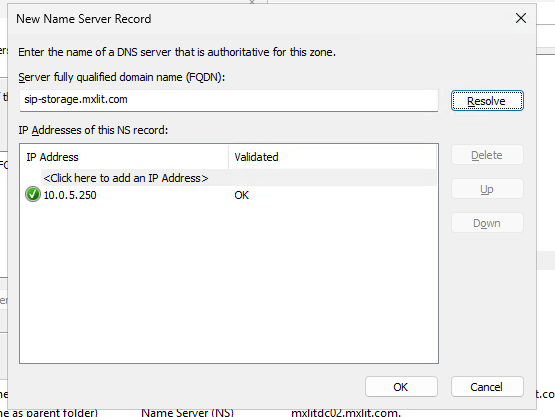

PowerShell Method (Infrastructure as Code)
If you prefer automation, run this on your Windows Server as Administrator:
# Define variables
$DomainZone = "mxlit.com"
$SmartConnectZone = "storage"
$SIPRecordName = "sip-storage"
$SIP_IP = "10.0.5.250"

# Create the A record for the SIP
Add-DnsServerResourceRecordA -ZoneName $DomainZone -Name $SIPRecordName -IPv4Address $SIP_IP

# Create the DNS Delegation
Add-DnsServerZoneDelegation -Name $DomainZone -ChildZoneName $SmartConnectZone -NameServer "$SIPRecordName.$DomainZone"

# Flush cache
Clear-DnsClientCache
Troubleshooting: The “Reserved NIC” Issue
In virtual environments like Proxmox, you might encounter an issue where your third or fourth network interface doesn’t respond to pings.
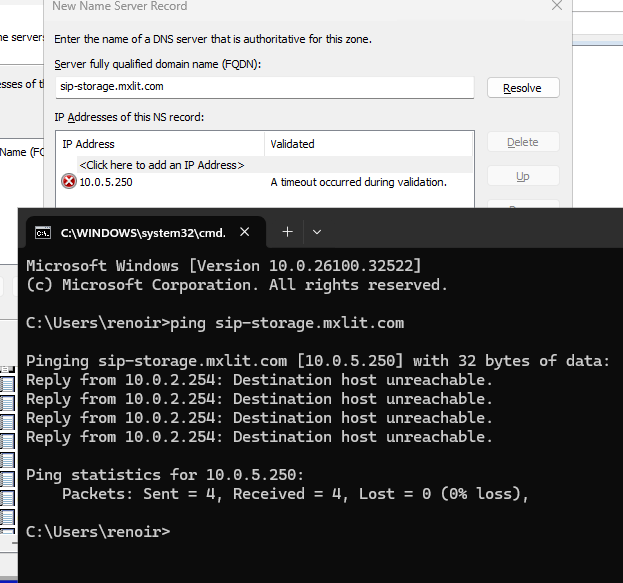
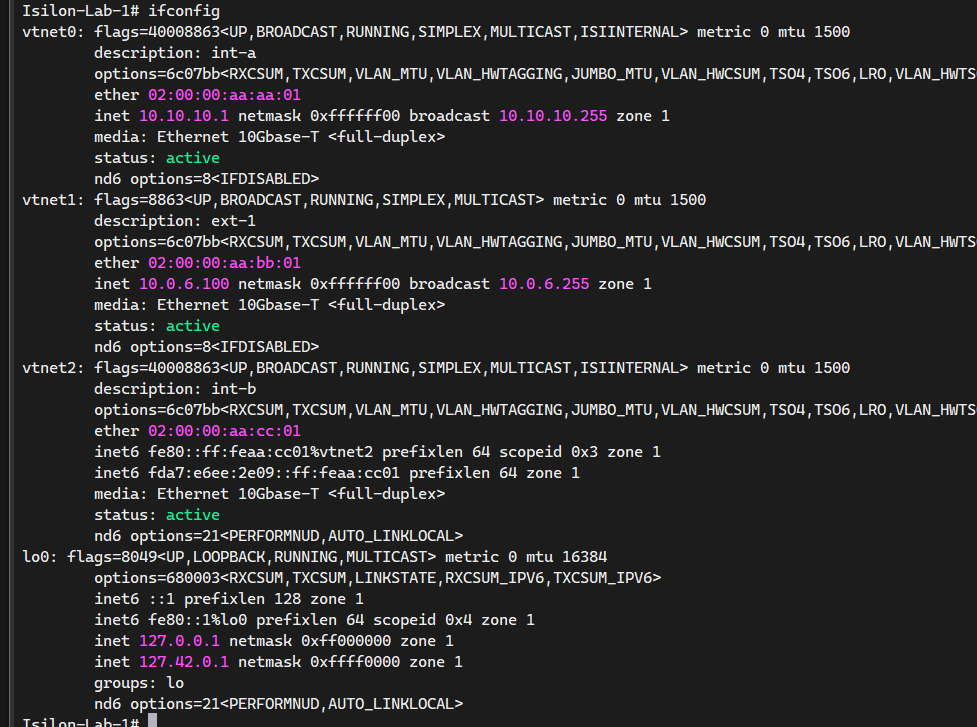
This often happens because OneFS might “kidnap” a newly added interface for internal cluster communication (int-b). You can verify this by running ifconfig inside the nodes.
The Fix:
- Gracefully shut down the cluster:
isi cluster shutdown --node-lnn all. - Add an additional (fifth) NIC in the same VLAN 105 through Proxmox.
- Restart the nodes and assign the correct, available interface to your data pool.
Step 3: Validation (The Moment of Truth)
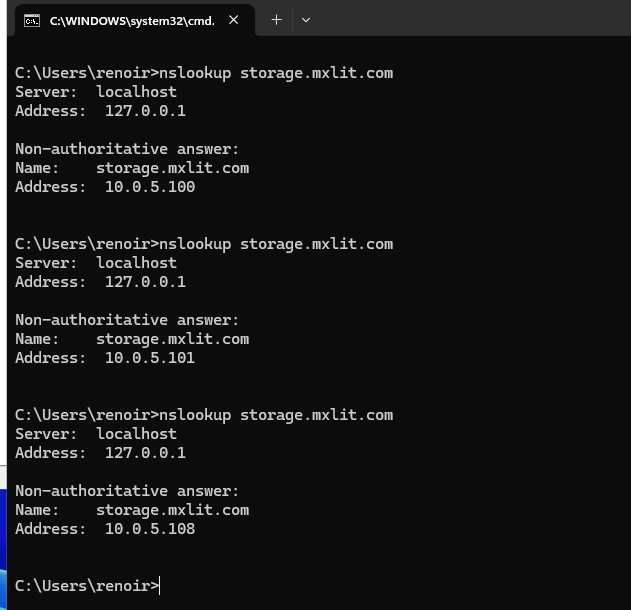
To verify the delegation, run nslookup from any network client:
# Query the SmartConnect zone multiple times
nslookup storage.mxlit.com
Run it 2rd or 3rd times. You should see the IP address in the response change every time, rotating between the data IPs of your nodes. This confirms the Round Robin load balancing is working correctly.
Conclusion
Congratulations! You have successfully configured an enterprise-grade network load balancer. Now, when you map a network drive to \\storage.mxlit.com\Share, OneFS intelligently decides which node will serve you.
While we have assigned this pool to the System zone for now, as we advance in the project, we will see how to implement Access Zones to segment traffic and security even further.
End of transmission.