
Before configuring the immutable repository as a final destination, we first need to present the physical server (or virtual machine) in a raw manner to our orchestrator. Veeam needs to register the underlying operating system to establish the encrypted connection and prepare it for its roles.
Presenting the Server
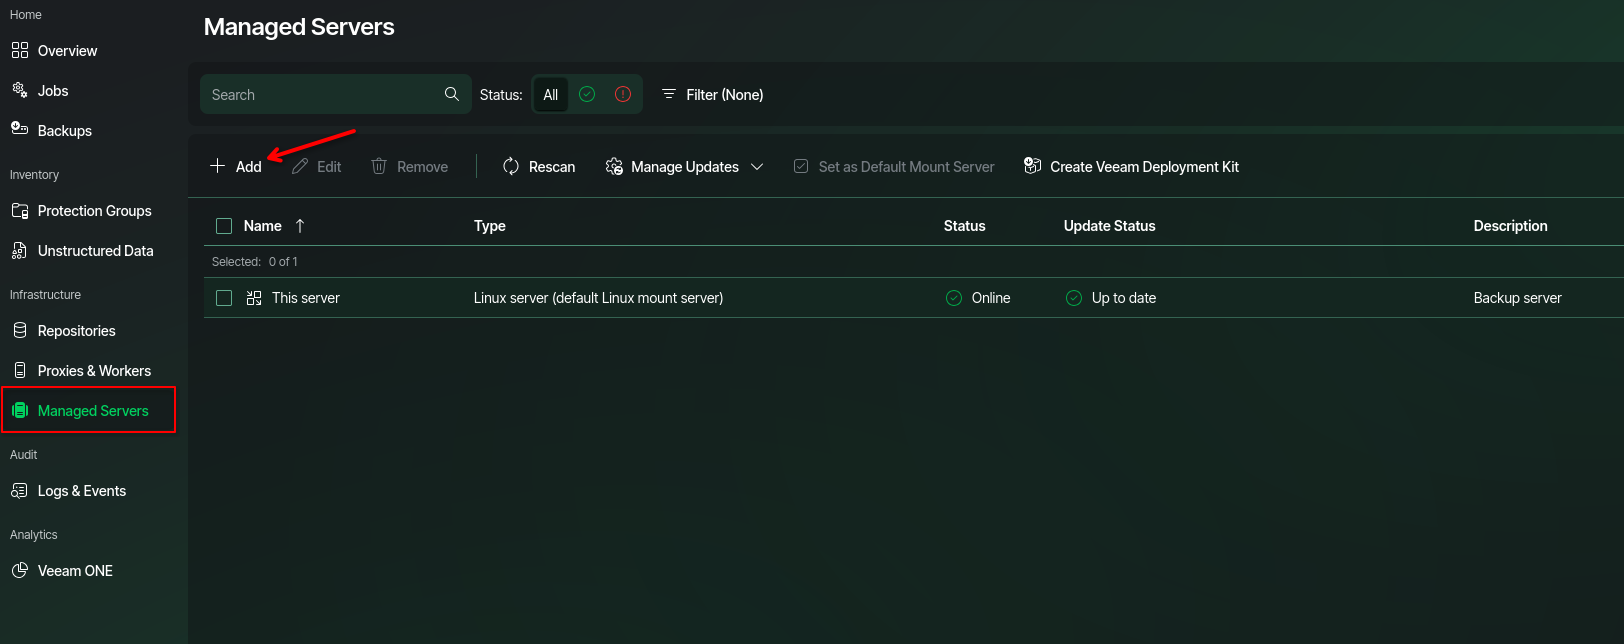
1. Navigate to Managed Servers In the main web interface, navigate to the left side menu, go down to the Infrastructure section and select Managed Servers. Once there, click the + Add button on the top bar. (This is the central inventory where all compute and storage nodes that receive orders from our orchestrator will live).
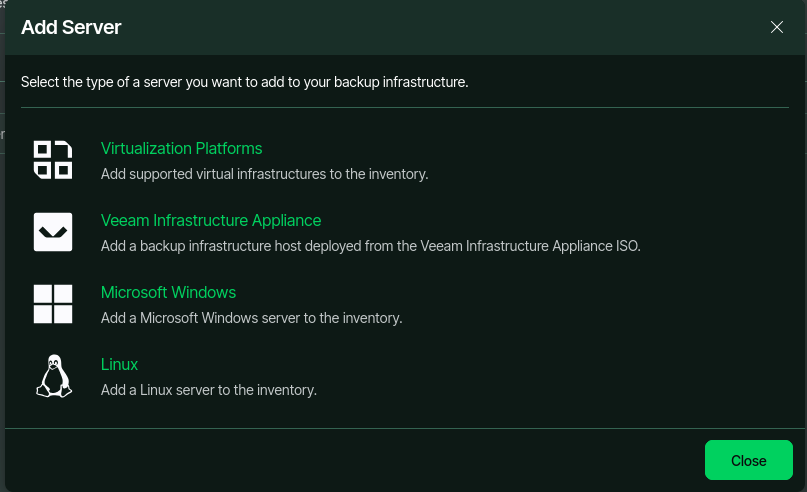
2. Select System Type The wizard will display a menu with compatible platforms. We will select the standard Linux option. This tells the Veeam engine that we are going to connect to a native operating system (such as Rocky Linux, Ubuntu, or Debian) using system credentials or SSH keys to manage it at a low level.
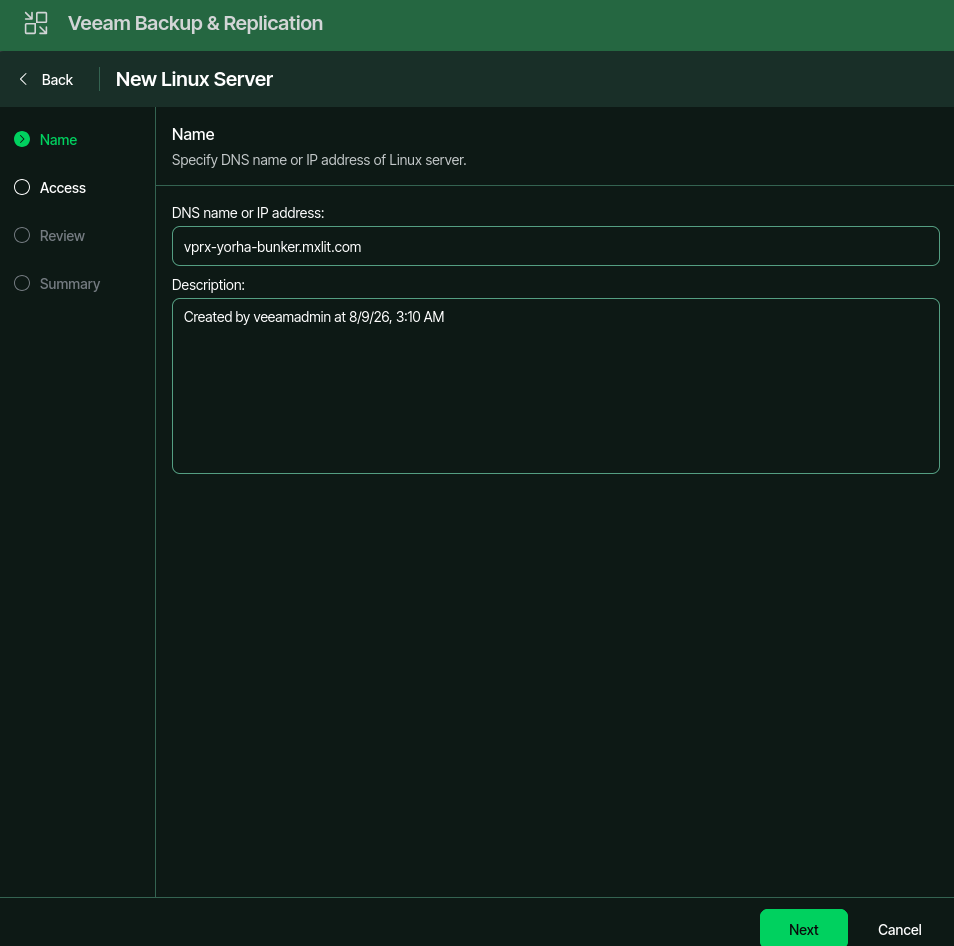
3. Identity and Network Resolution (Name)
On the New Linux Server screen, we must enter the network address of our host. In the DNS name or IP address field, we enter vprx-yorha-bunker.mxlit.com.
4. Certificate-Based Authentication (Access)
On the Access screen, we encounter one of the strongest security pillars of this new architecture.
Gone are the days of leaving port 22 (SSH) permanently open to inject classic credentials with a username and password. Here we will obligatorily select the Connect using certificate-based authentication (recommended) option.
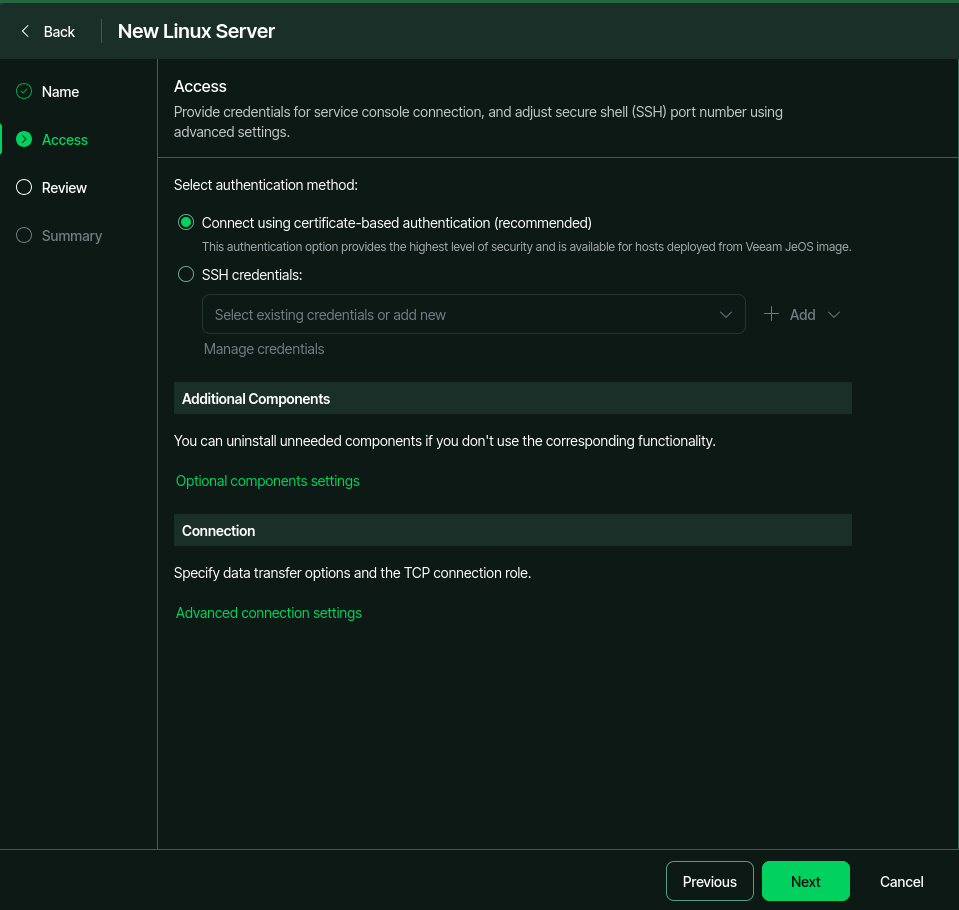
By choosing this method, the orchestrator will use asymmetric certificates to establish a secure tunnel. This is what allows us to keep the attack surface to an absolute minimum; there are no passwords traveling over the network and no need to manually manage public keys, everything is handled through the secure exchange of the operating system itself. We select the option and click Next.
5. Fingerprint Validation and Deployment (Review & Summary)
Immediately after advancing, the orchestrator will make the first network “touch” to the Bunker. At this point, the system will prompt a security warning asking you to confirm the Fingerprint (the SSH fingerprint) of the destination server.
Accept this alert without hesitation; it is the initial handshake that establishes permanent cryptographic trust between both machines.
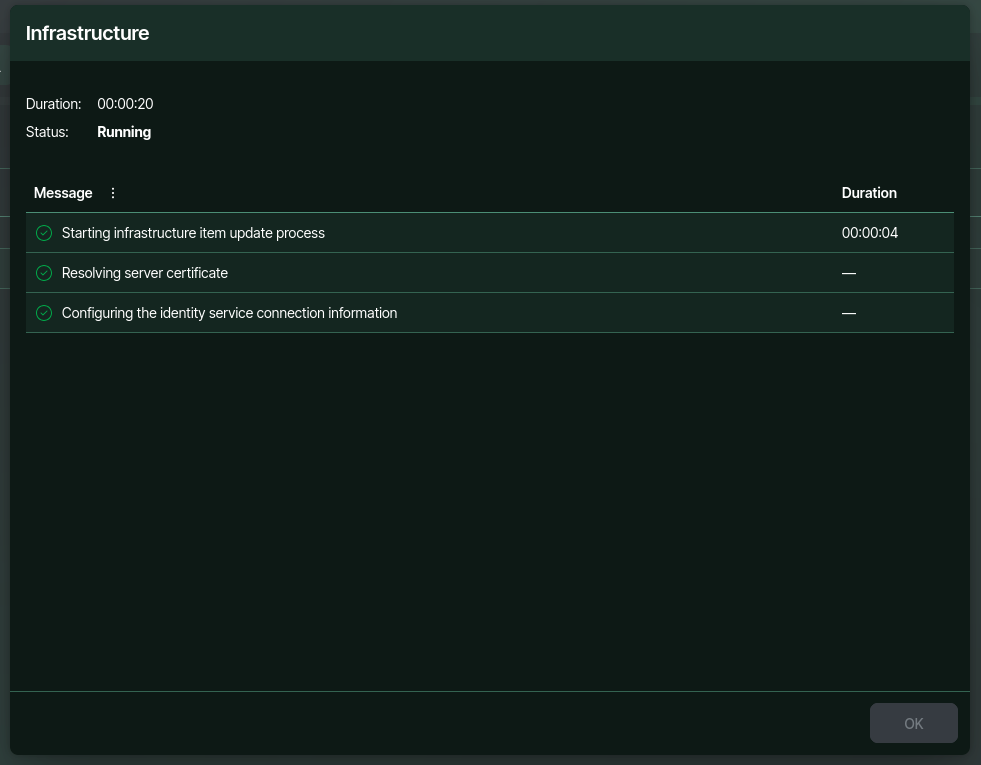
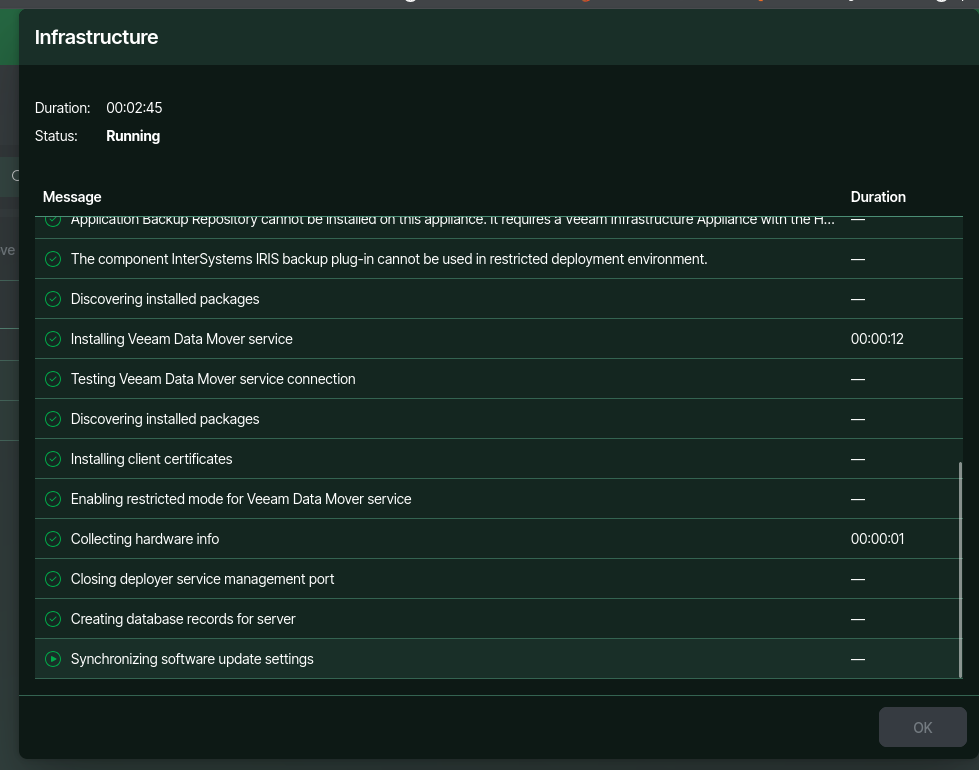
After accepting the fingerprint, the wizard will automatically begin injecting and compiling the transport services (Data Mover) and the necessary Linux dependencies to operate. You just need to wait for the component installation to finish.
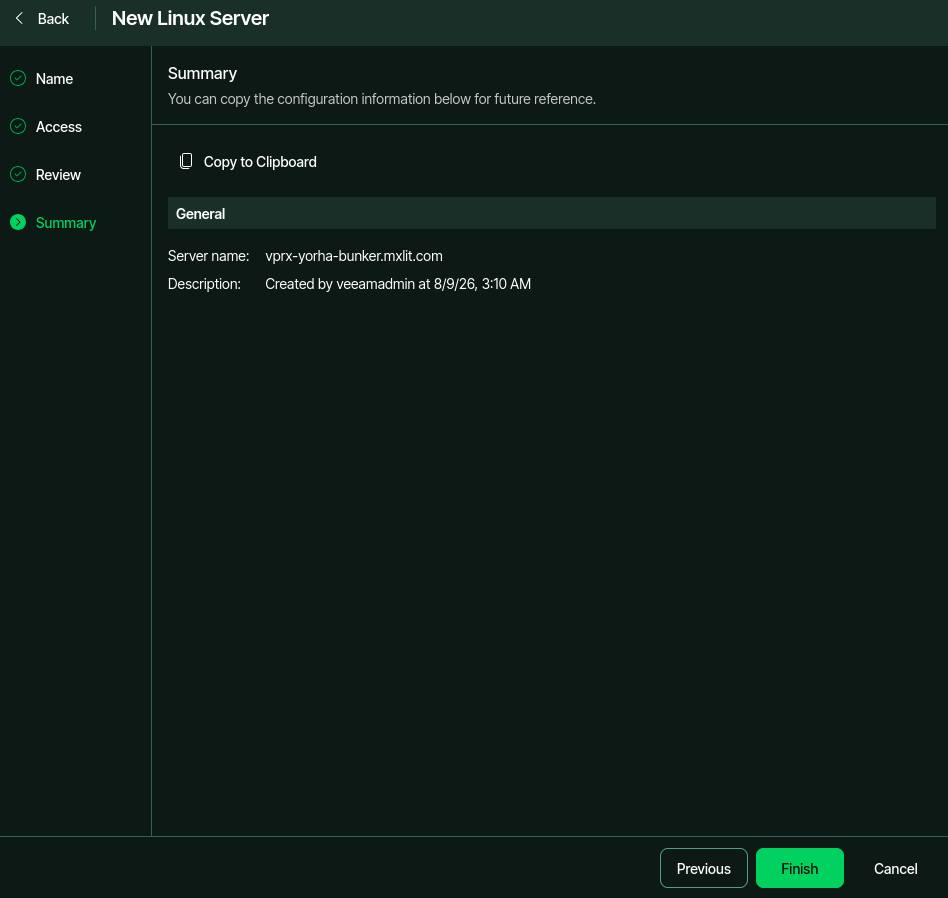
Once the process finishes, you will reach the Summary screen. Verify that the server name (vprx-yorha-bunker.mxlit.com) matches your design and press Finish.
Adding the Repository
1. Add the New Repository
Once the Linux server is part of our inventory, the next step is to assign it its storage function. To do this, we go to the Infrastructure section in the left side menu, enter Repositories and click the + Add button at the top.
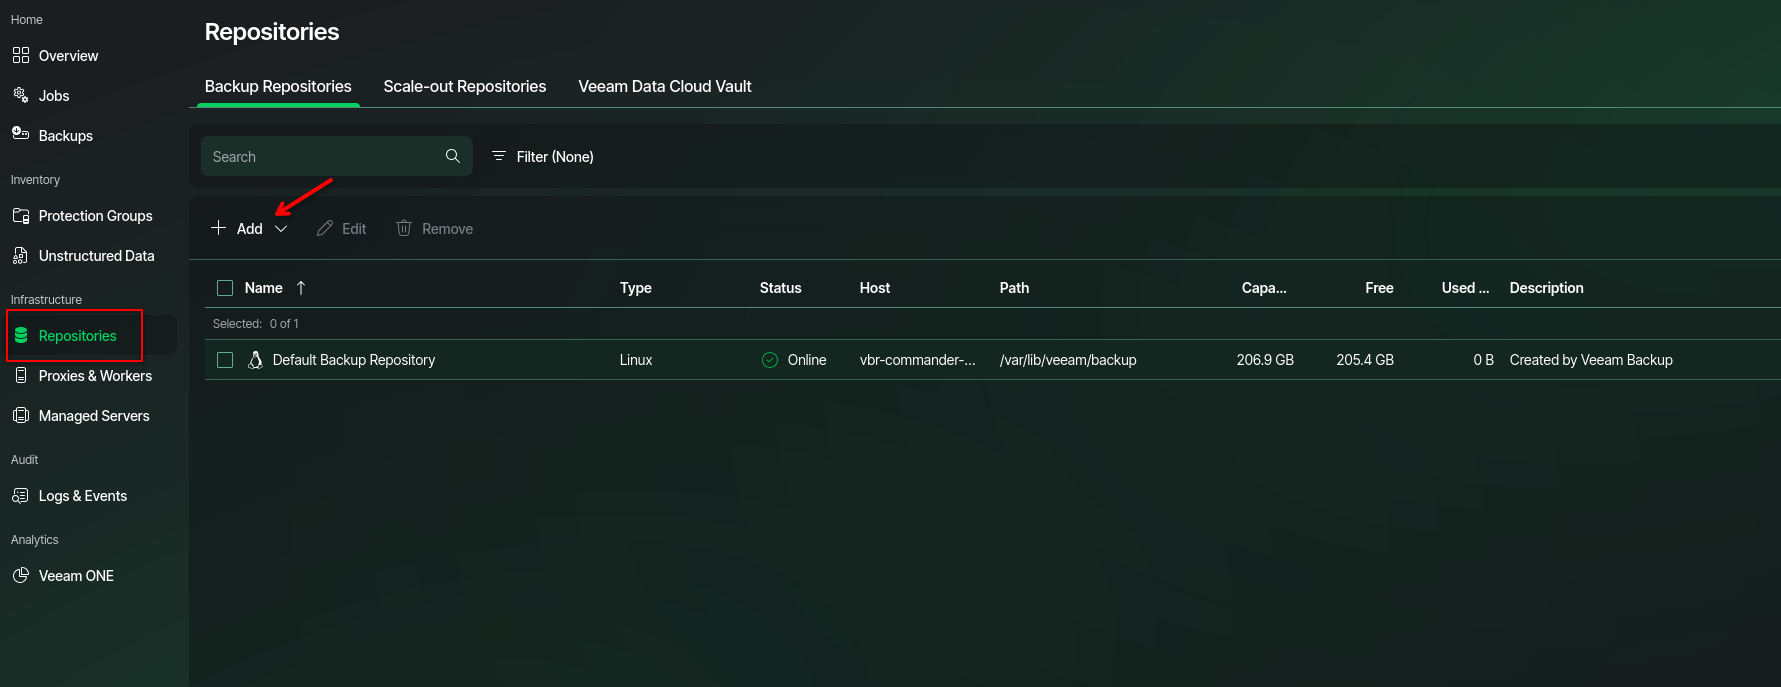
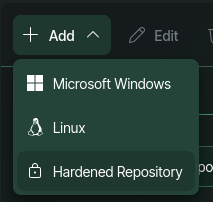
2. Select Type: Hardened Repository
When the storage options unfold, it is important not to go the traditional Linux repository route. We will directly select Hardened Repository. By choosing this option, we indicate to the platform that it must deploy the necessary services to enable immutability, managing permissions at the file system level to protect backups against modifications or ransomware.
3. Assign a Volume Name
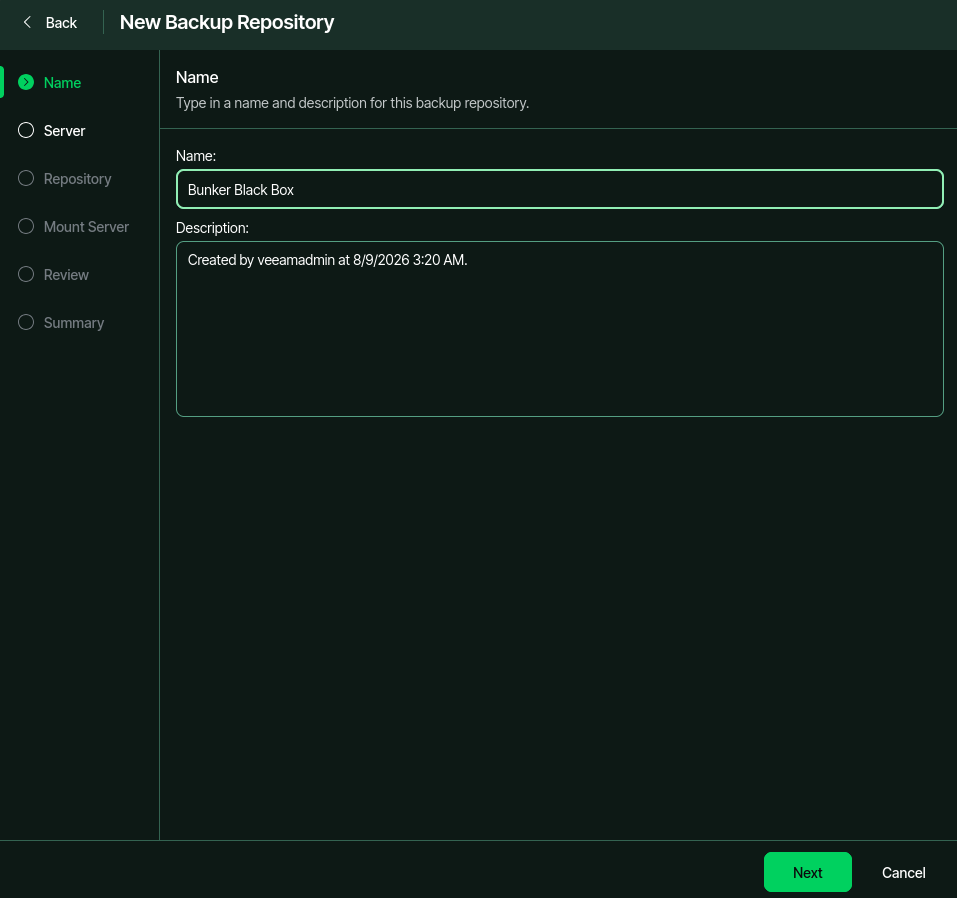
When the configuration wizard opens, the first step is to define how we will identify this space within the console. Following our topology convention, we will call it Bunker Black Box. The description field auto-completes with the user and the exact creation date, a very useful detail for audit control. We press Next to move on to server assignment.
4. Assign the Server
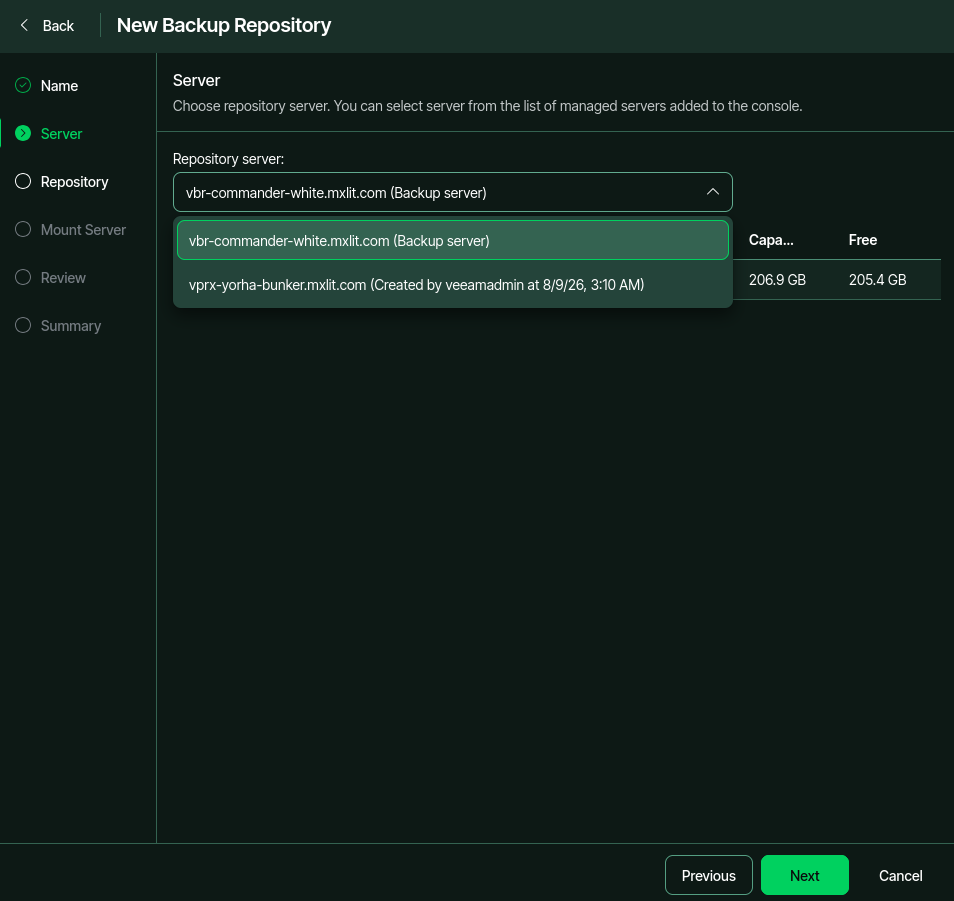
On the Server screen, we will tell the wizard which of our physical inventory machines will be responsible for mounting and managing the data.
When you open the dropdown menu, you will see your main orchestrator (vbr-commander-white), but for this architecture, we must select the isolated host we previously added: vprx-yorha-bunker.mxlit.com.
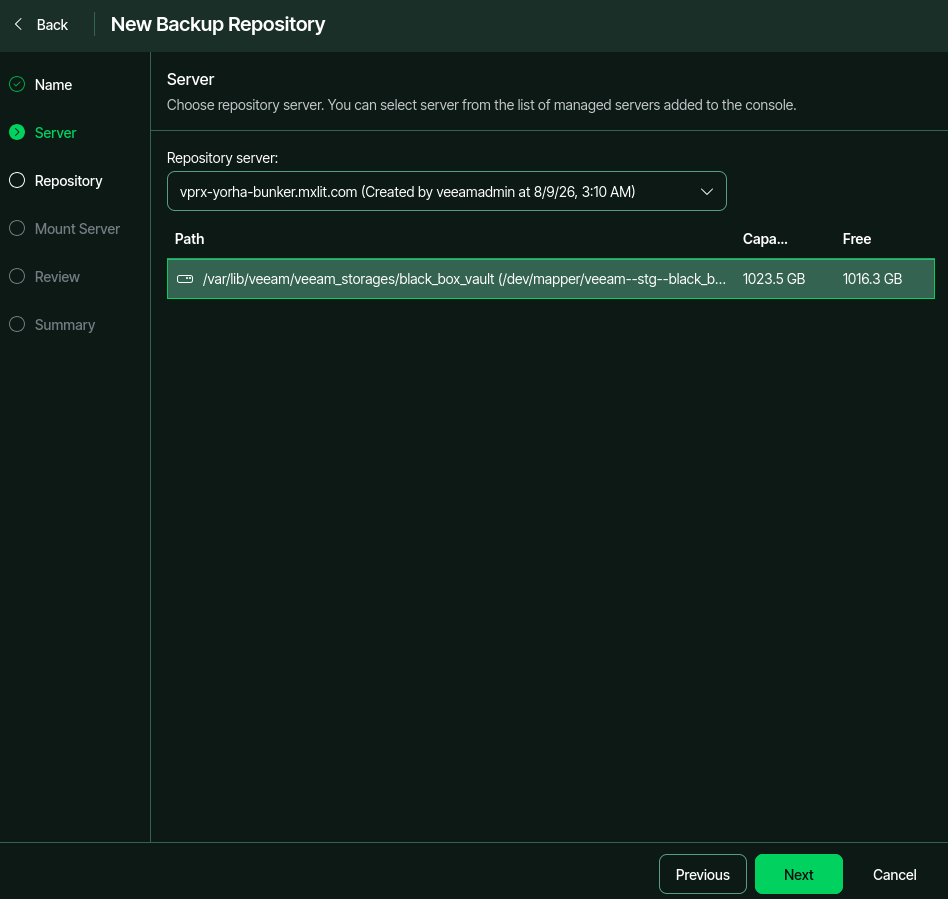
Upon selecting it, the orchestrator makes a quick query to the operating system through the secure tunnel. As you can note at the bottom of the screenshot, it automatically detects the available mount points, showing our designated path (/var/lib/veeam/veeam_storages/black_box_vault...) along with the terabyte of capacity we assigned to it. With the correct server in sight, we click Next to continue configuring the storage path.
5. Immutable Repository Configuration
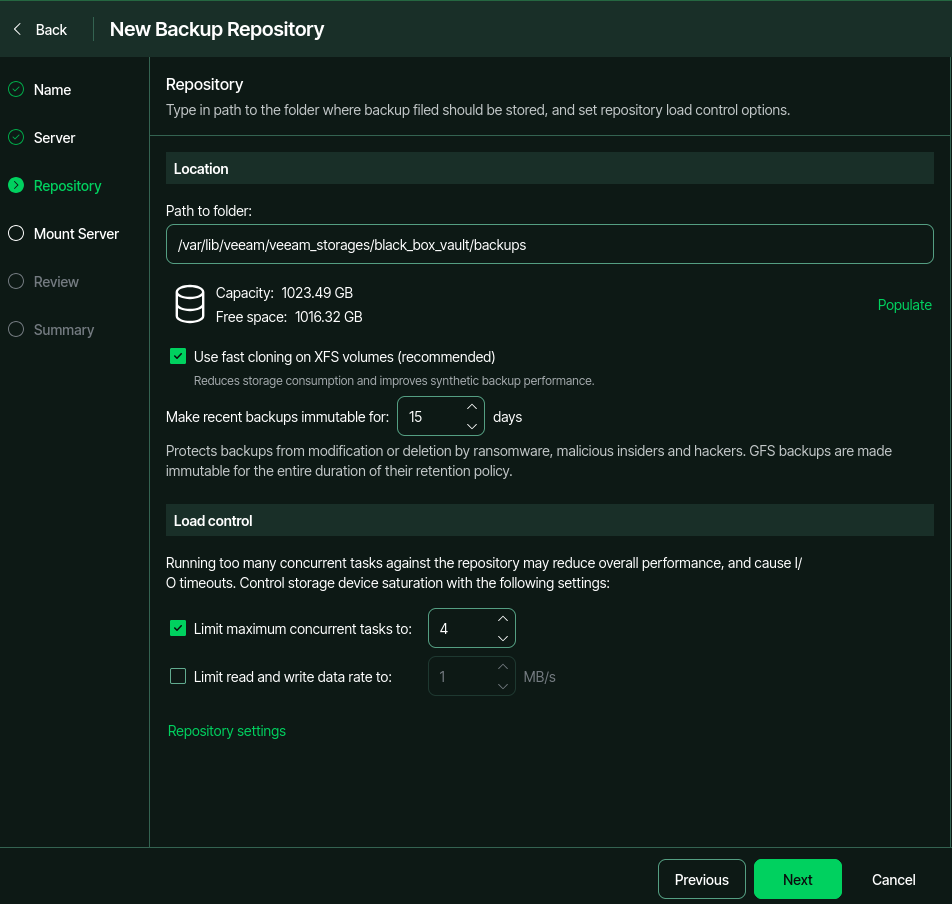
We reach the most critical screen of our architecture: the definition of the Hardened Repository. This is where raw storage transforms into a cryptographic vault. Let’s analyze the key parameters to ensure the infrastructure offers maximum performance without sacrificing security.
1. Path and Capacity Validation (Location)
We have pointed the directory directly to the volume mounted at /var/lib/veeam/veeam_storages/black_box_vault/backups.
Implementation Tip: Before continuing, it is essential to click the Populate option (on the right). This action forces the orchestrator to communicate with the Linux appliance, verify that the read/write permissions are correct, and calculate the actual disk space. If this step fails, it’s an early indicator of permission issues in the operating system; if it shows the correct capacity, the link is solid.
2. Fast Cloning on XFS Volumes
Make sure to leave the Use fast cloning on XFS volumes option enabled. This is the most important technical advantage of using Linux on the backend. Fast Clone takes advantage of block-level reflink technology native to the XFS file system. In practice, when the server needs to group the week’s incremental backups to generate a full file (Synthetic Full), the operation will take only seconds instead of hours. Even better: it won’t consume additional disk space, since the system simply creates pointers to data blocks that already exist.
3. Immutability Window
Configuring Make recent backups immutable for: [ 7 ] days is our disaster insurance policy. Seven days is the industry standard for short-term retention. This ensures that, against any ransomware encryption attempt or malicious deletion, there is at least one entire week of data that physically cannot be altered. During this period, not even the local root user has the necessary privileges to purge these files.
4. Load and Performance Control
We have set the maximum concurrent tasks limit exactly at 4 (Limit maximum concurrent tasks to: 4). In the Veeam engine, a “task” equals the processing of an individual virtual disk. Respecting this limit is vital for two architectural reasons:
- Compute Management: Each concurrent task consumes approximately 1 CPU core and 2 GB of RAM. Maintaining this limit avoids choking server resources during nightly backup windows.
- I/O Blender Prevention: If the underlying physical storage uses mechanical disks, sending too many simultaneous write tasks saturates the read heads, which paradoxically plummets speed. Limiting concurrencies maintains a sustained and sequential data flow.
6. The Mount Server
In the Mount Server phase, we define for the platform which machine will be responsible for “opening” backup files when we need to extract specific data.
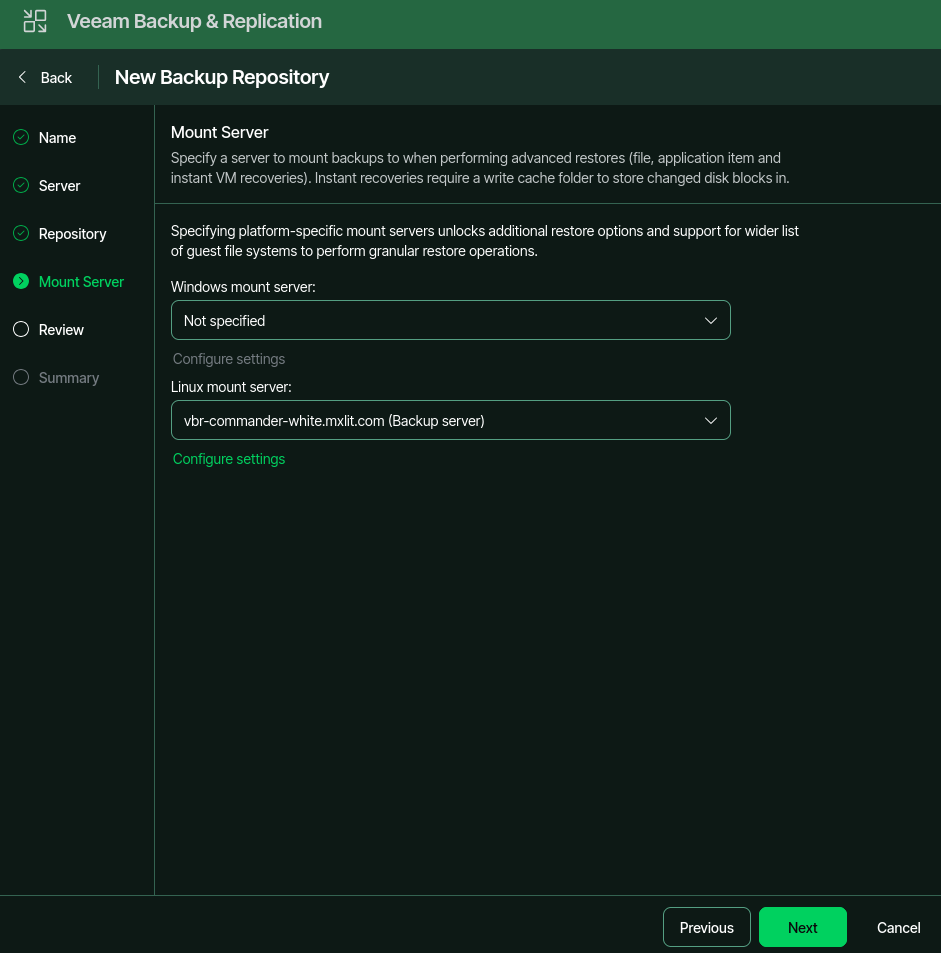
When you need to recover a single text file, or decide to turn on a virtual machine directly from the repository (Instant VM Recovery), the main backup file (which is compressed and encrypted) is not fully extracted to disk; instead, it is temporarily mounted in the memory of this assigned server.
Let’s analyze how to configure this section to get the most out of our 100% Linux architecture:
- Windows mount server (Not specified): In our environment, we will leave this field empty. By operating with the new v13 Appliance native on Linux, we do not need to rely on a Windows operating system to perform restorations. If at any time you need to make very specific granular recoveries at the application level (for example, extracting an Active Directory object), the Veeam engine is dynamic enough to deploy a Helper Appliance (a microscopic, temporary virtual machine) on the fly, do the work and destroy it, saving us the cost and maintenance of a permanent Windows Server license.
- Linux mount server (
vbr-commander-white.mxlit.com): This is where the topology shines. We will directly assign our master orchestrator for this task. Given that our main server runs on Rocky Linux, it has native kernel-level support to read file systems such as ext4, XFS, and BTRFS (the standards in any Linux distribution or hypervisor like Proxmox). If tomorrow you accidentally delete thedocker-compose.ymlfile from any of your containers, the Commander will simply read the immutable blocks from the vault, mount the virtual file system, and allow you to extract your text file in a matter of seconds.
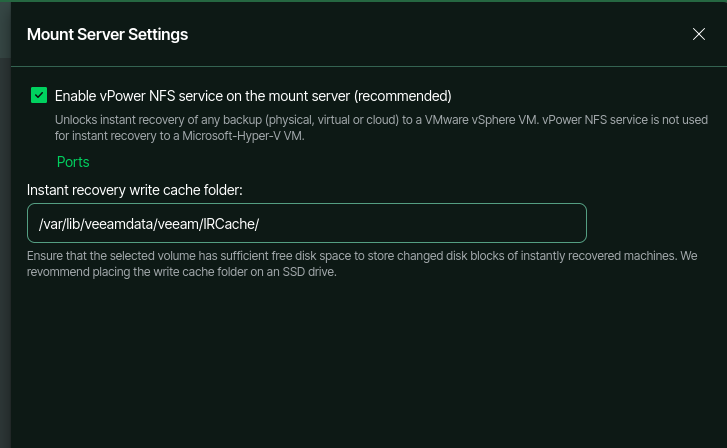
⚙️ Advanced Concept: The Write Cache
The interface description mentions that instant recoveries require a cache folder. This is a pillar of immutability: when you bring up a VM directly from the backup, the file hosted in your vault remains strictly read-only. The operating system of the restored machine will think it’s operating normally, but all writes or temporary changes it generates while turned on will be diverted to this cache folder managed by the Mount Server, maintaining the total integrity of your original backup copy.
Verify that the Linux server is correctly assigned in the dropdown menu and press Next to reach the final review screen.
7. Component Review and Vault Scanning
We reach the prelude to the final creation. The Review screen is not a simple administrative formality; it is the panel where the orchestrator validates the logical topology and determines what services it needs to inject for the vault to operate with all its capabilities.
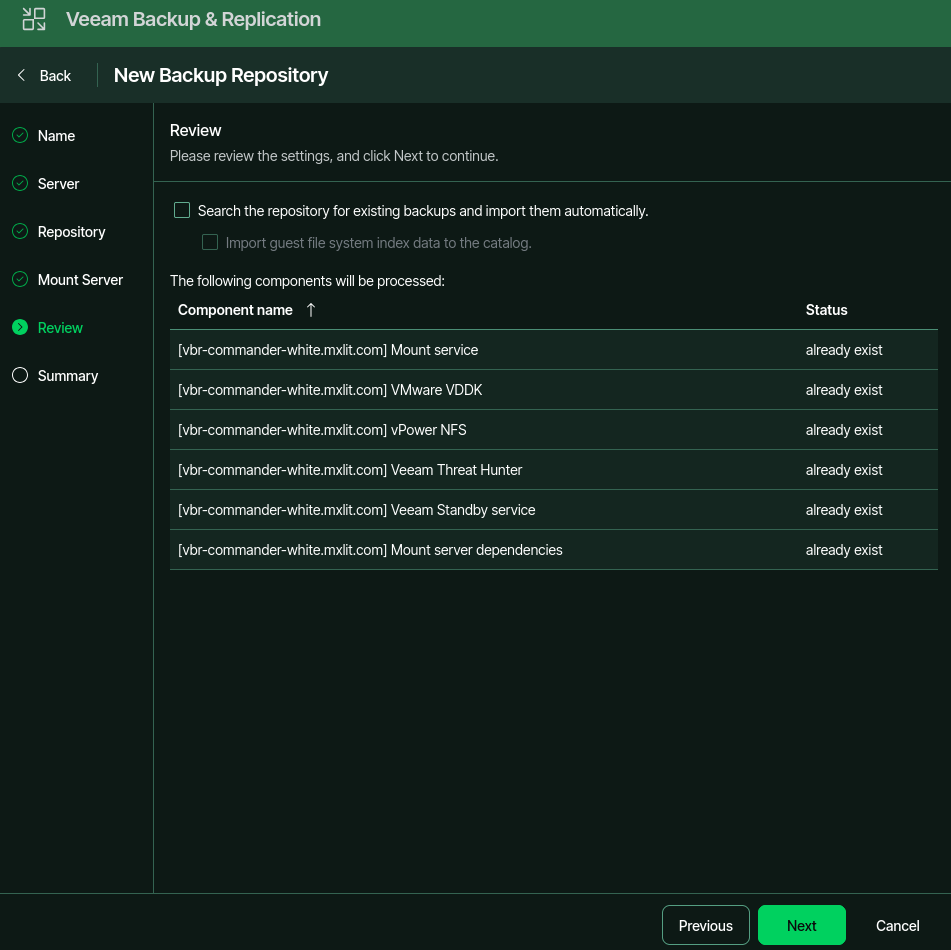
Let’s analyze the two fundamental elements of this configuration:
1. Existing Backups Scanning (Search the repository…) In the screenshot, the Search the repository for existing backups and import them automatically box is unchecked. For our architecture, this is exactly what we are looking for, as we are initializing a completely clean directory in our immutable vault.
⚙️ Recovery and Migration Scenario: If in the future you need to rebuild your orchestrator server after a total disaster, or if you were mapping an old hard drive from your previous version 12 environment to this new appliance, this is where you check the box. By doing so, the engine tracks the storage disk, reads the metadata of orphaned backup files, and automatically reinjects them into your new server’s database to give you back control.
2. Service Injection (Component Status)
The bottom table details the microservices the orchestrator requires to deploy to manage the data. In our scenario, absolutely all components mark the status already exist.
This happens due to efficient architectural design: in the previous step we decided that the master server itself (vbr-commander-white.mxlit.com) would act as our Linux mount server. Being the central node of our network, it already has all this arsenal installed at the OS level.
It’s worth highlighting the power of the engines listed here that are ready to operate:
- Veeam Threat Hunter: One of the platform’s most aggressive defenses. It’s the heuristic analysis engine that silently scans the data flow for malware signatures, ransomware, and anomalous encryption during the backup process, blocking threats before they lodge in the vault.
- vPower NFS: This is the brain behind Instant VM Recovery. This service allows the orchestrator to emulate a standard NFS datastore, delivering data blocks to the hypervisor to turn on heavy virtual machines directly from the compressed backup file in seconds.
- VMware VDDK: The Virtual Disk Development Kit libraries. Even if your cluster and workloads operate on other open-source virtualization technologies, the appliance includes these binaries by default to guarantee absolute compatibility in hybrid cloud architectures.
Once validated that all internal services respond correctly and are ready for action, simply press Next to apply the changes to the database.
8. Summary and Final Verification
We reach the end of the wizard. The Summary screen presents us with a complete audit report with all the parameters we configured for our immutable vault. This is the critical moment to do a double validation before confirming the creation of the infrastructure in the orchestrator’s database.
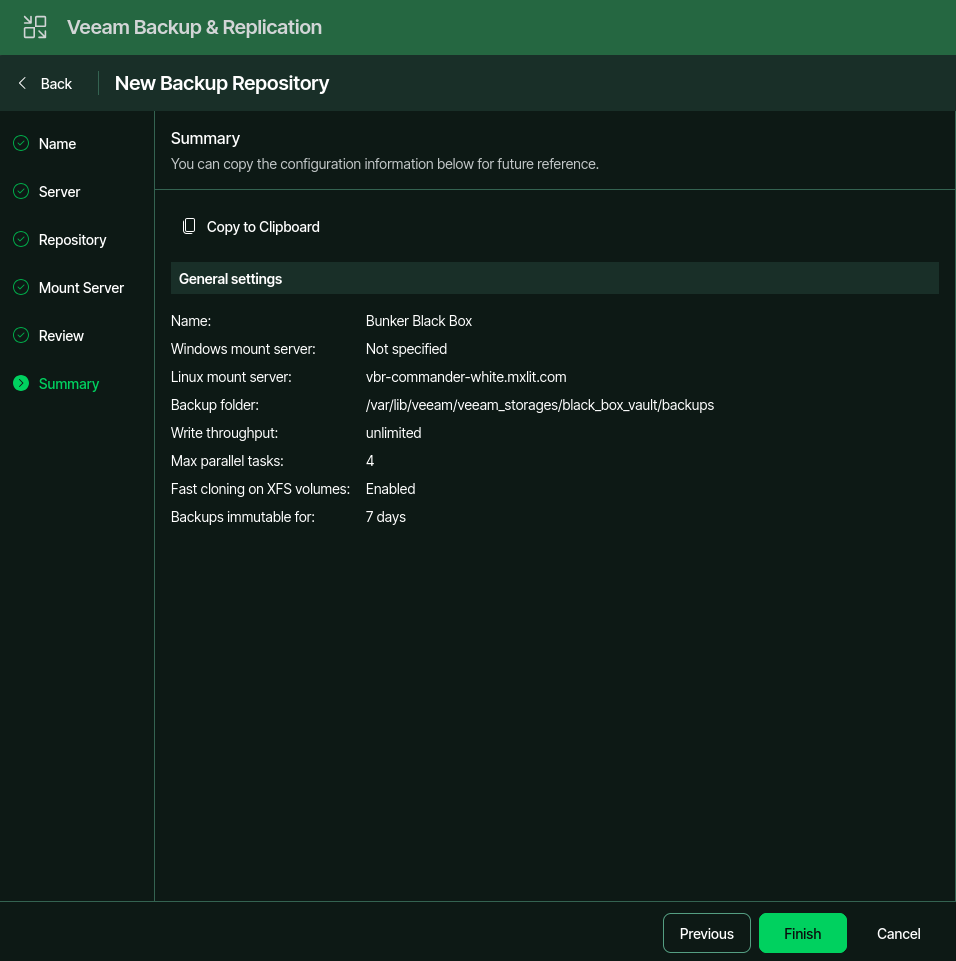
Let’s review the topology we just put together:
- Identity (Name): The repository was officially registered as
Bunker Black Box. - Mount Architecture: We confirmed a 100% Windows-free operation (
Not specified); the full weight of granular and instant restorations falls on our main Linux orchestrator (vbr-commander-white.mxlit.com). - Storage: The data points exactly to the armored path
/var/lib/veeam/veeam_storages/black_box_vault/backups. - Performance Control: A strict limit of 4 parallel tasks (
Max parallel tasks) to maintain a healthy I/O flow, accompanied by the star feature Fast cloning on XFS volumes confirmed as Enabled to achieve synthetic backups at hyperbolic speed.
🛠️ Live Troubleshooting: The Immutability Detail
If you look closely at the last line of our validation screenshot, you’ll notice that the Backups immutable for parameter was set to 7 days. If in your original architectural design you planned to extend this ransomware protection window to 15 days, this is the exact moment where the summary screen proves its worth.
It’s a very common layer-8 error: when configuring the repository, it’s easy to overlook the system default (7 days) on the previous tab. If this happens to you, the platform is very flexible to correct it:
- The immediate solution: Before confirming anything, simply click the Previous button a couple of times to return to the Repository tab, change the value from 7 to 15, and advance back to the summary.
- The post-deployment solution: If you already clicked Finish out of inertia, no problem. You can navigate to the Backup Infrastructure > Backup Repositories view in your console, right-click on
Bunker Black Box, select Properties, and modify the retention days live. Any new backup entering the volume will instantly adopt the new 15-day immutability rule.
Once you ensure that all values reflect the exact strategy of your data center (whether 7, 15, or 30 days of armor), simply press the Finish button.
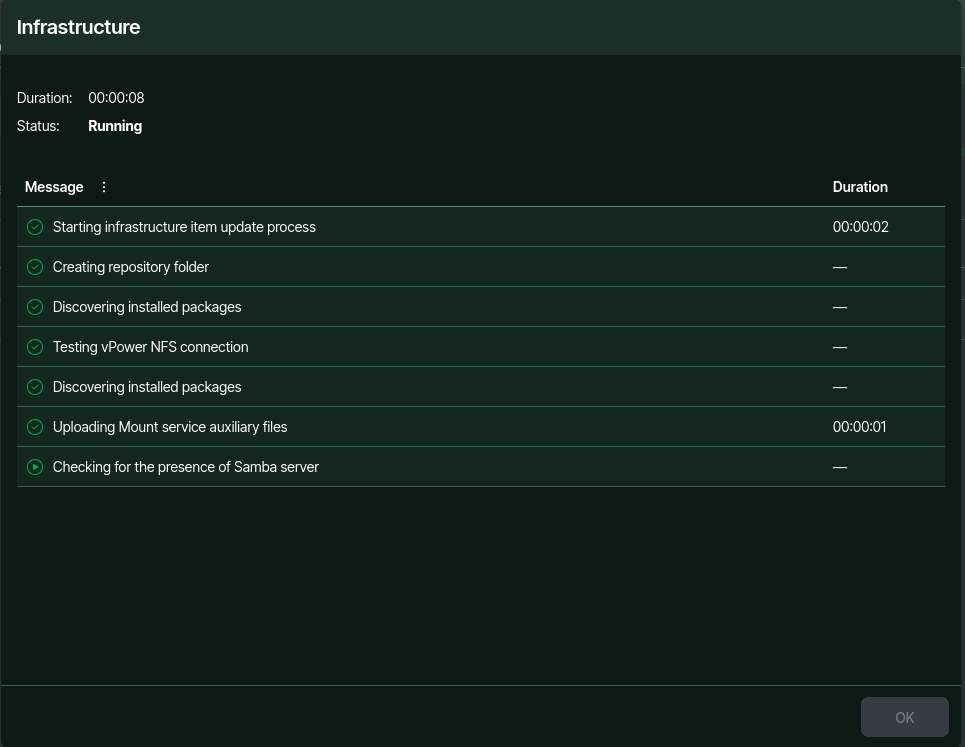
9. The Final Result
Once the wizard finishes, the console redirects us to the main Backup Repositories view. It is here where we see the fruit of all our design and Zero Trust architecture work.
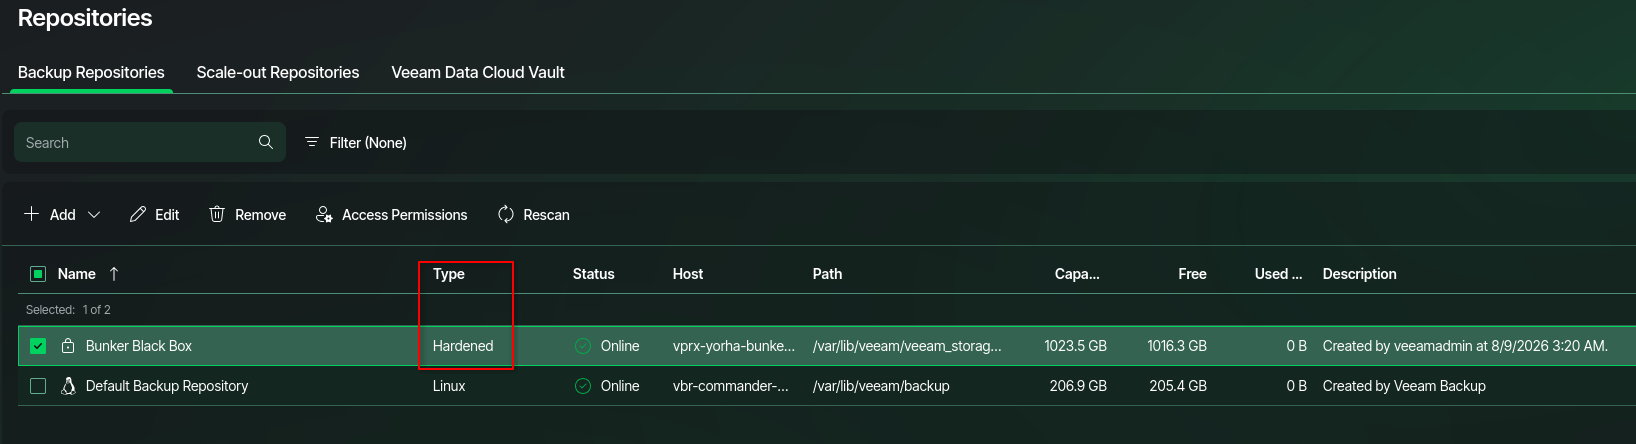
Looking at the infrastructure list, our Bunker Black Box is already registered, online, and ready to operate. There are critical details in this panel that validate that the technical deployment was a resounding success:
- The “Hardened” Badge (Type): This is the most important indicator of the entire configuration. As highlighted in the red box, the Veeam engine officially recognizes this volume not as a simple Linux destination, but with the strict Hardened classification. This certifies that asymmetric communication was successful and the immutability daemon has absolute control at the file system level to block any premature modification or deletion attempts.
- Capacity & Path: The orchestrator correctly reads our assigned 1 TB (1023.5 GB) volume from the virtualization cluster, pointing exactly to the isolated path within the
vprx-yorha-bunkerhost. - Creation Audit: The description column confirms that the initial connection and the creation of the folder structure was successfully executed by our operating system administrator (
veeamadmin).
🛡️ Best Practices: The Default Repository
In the second row, you will notice that there is a volume called Default Backup Repository hosted on the main orchestrator. This is a local space that the installer automatically creates. Never use this default repository to host workloads in your environment, as it lacks the immutability flags.
The design recommendation: Reserve this small default repository solely and exclusively to store Configuration Backups (the daily backups of the Veeam database itself). In this way, you maintain perfect logical separation between console configuration and the armored data vault.
Conclusion
By presenting the underlying Linux host securely via certificate-based authentication and mapping the block storage directly to our Hardened Repository, we have successfully created a bulletproof vault for our data. Relying on XFS’s Fast Clone technology ensures high-speed synthetic backups with zero extra capacity overhead, while our strict 4-task limit prevents I/O blender issues. With immutability locked in, our backups are now physically shielded against tampering or ransomware, providing a rock-solid foundation for our disaster recovery strategy.